Multiplexer Wiring Diagram
- Category : Wiring Diagram
- Post Date : January 22, 2026
Multiplexer Wiring Diagram
Electric Work Wiring Diagram
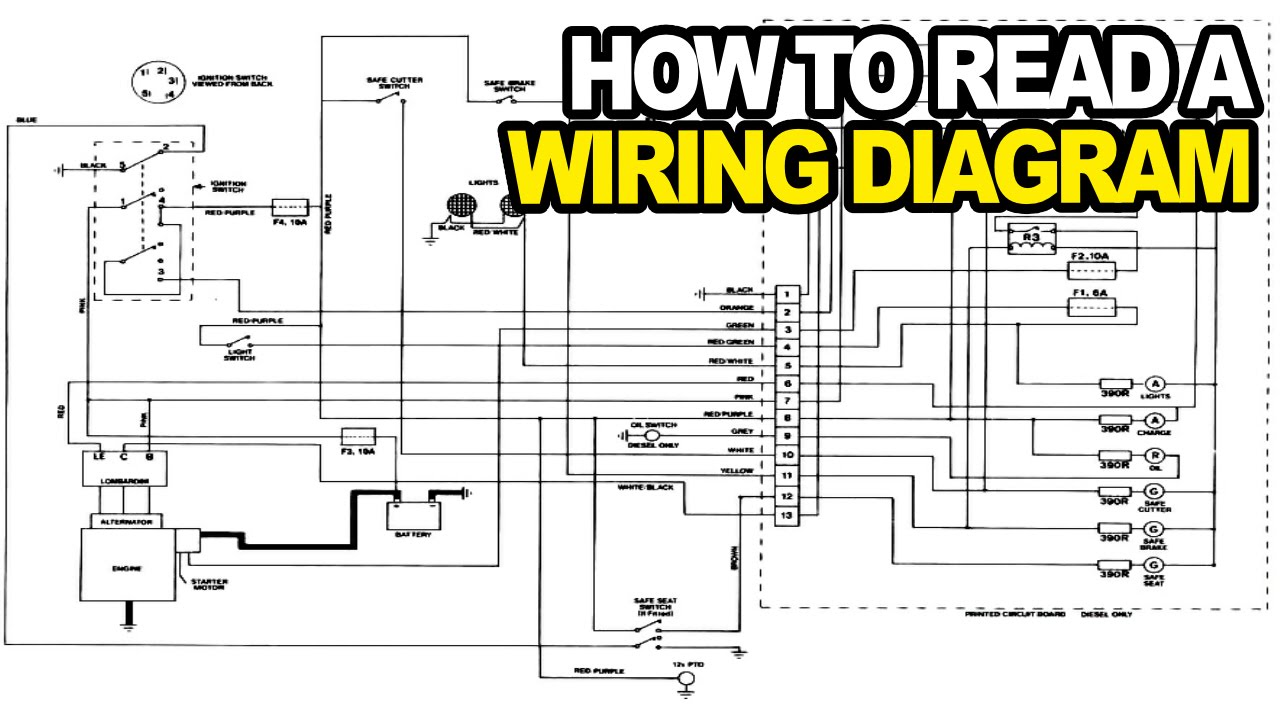
How To Read An Electrical Wiring Diagram


Reading Making Sense Of Wiring Diagrams Helping A
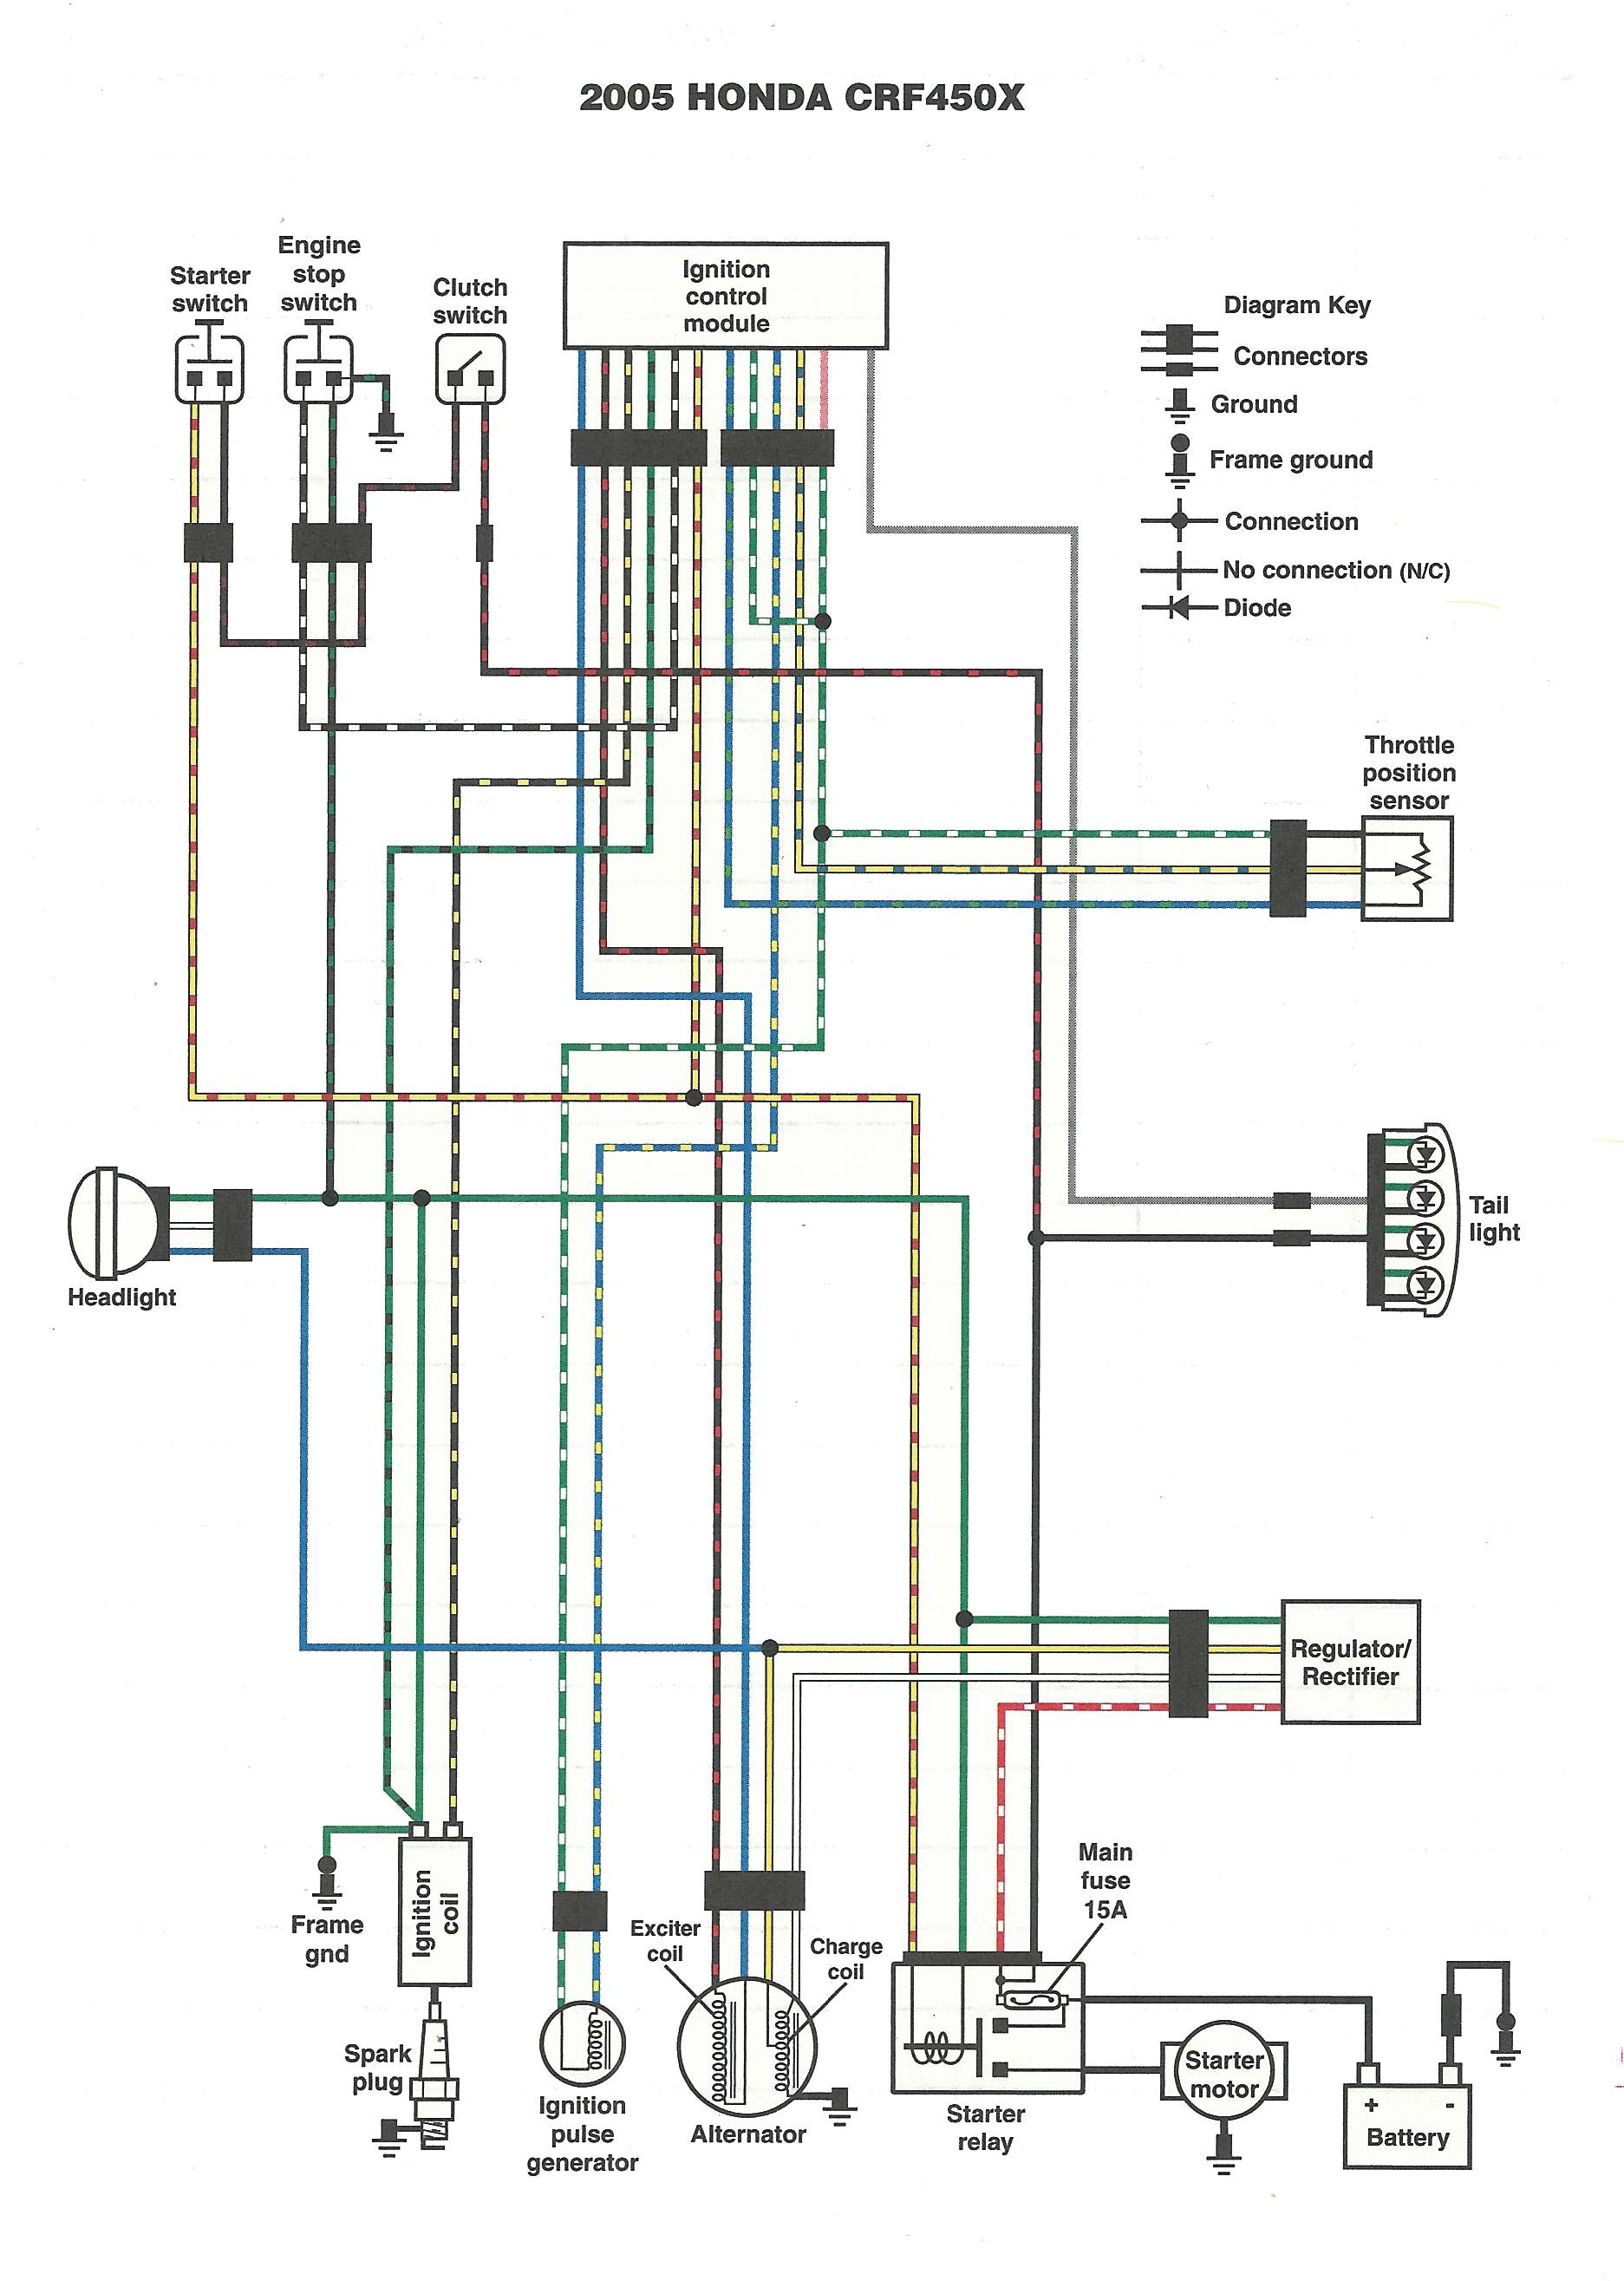
Dan U0026 39 S Motorcycle U0026quot Wiring Diagrams U0026quot
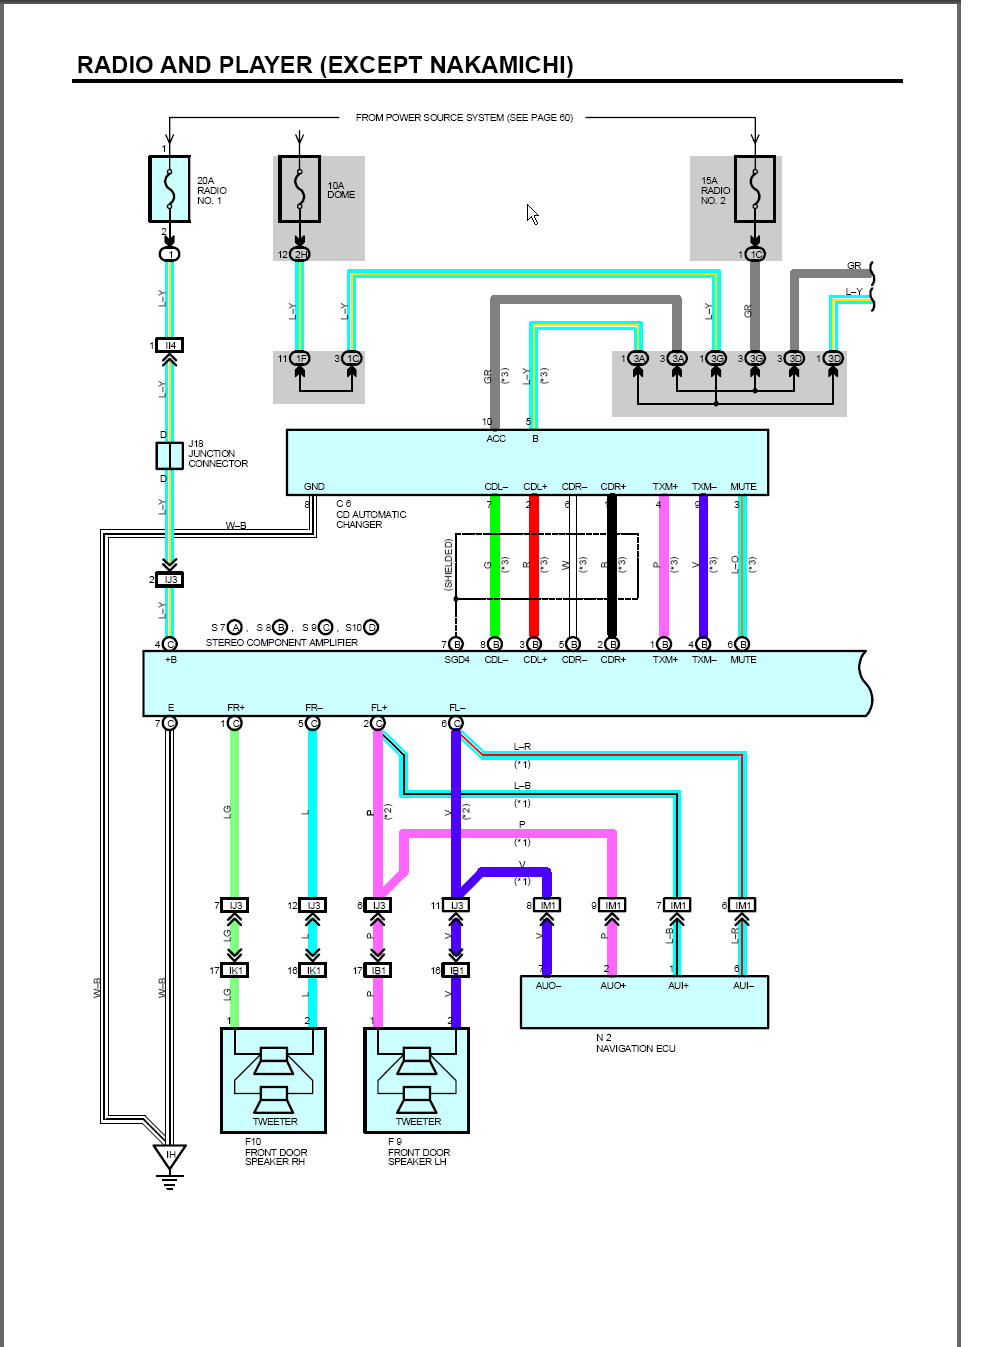
Wiring Diagram Help - Clublexus


Wiring Diagram

Repair Guides
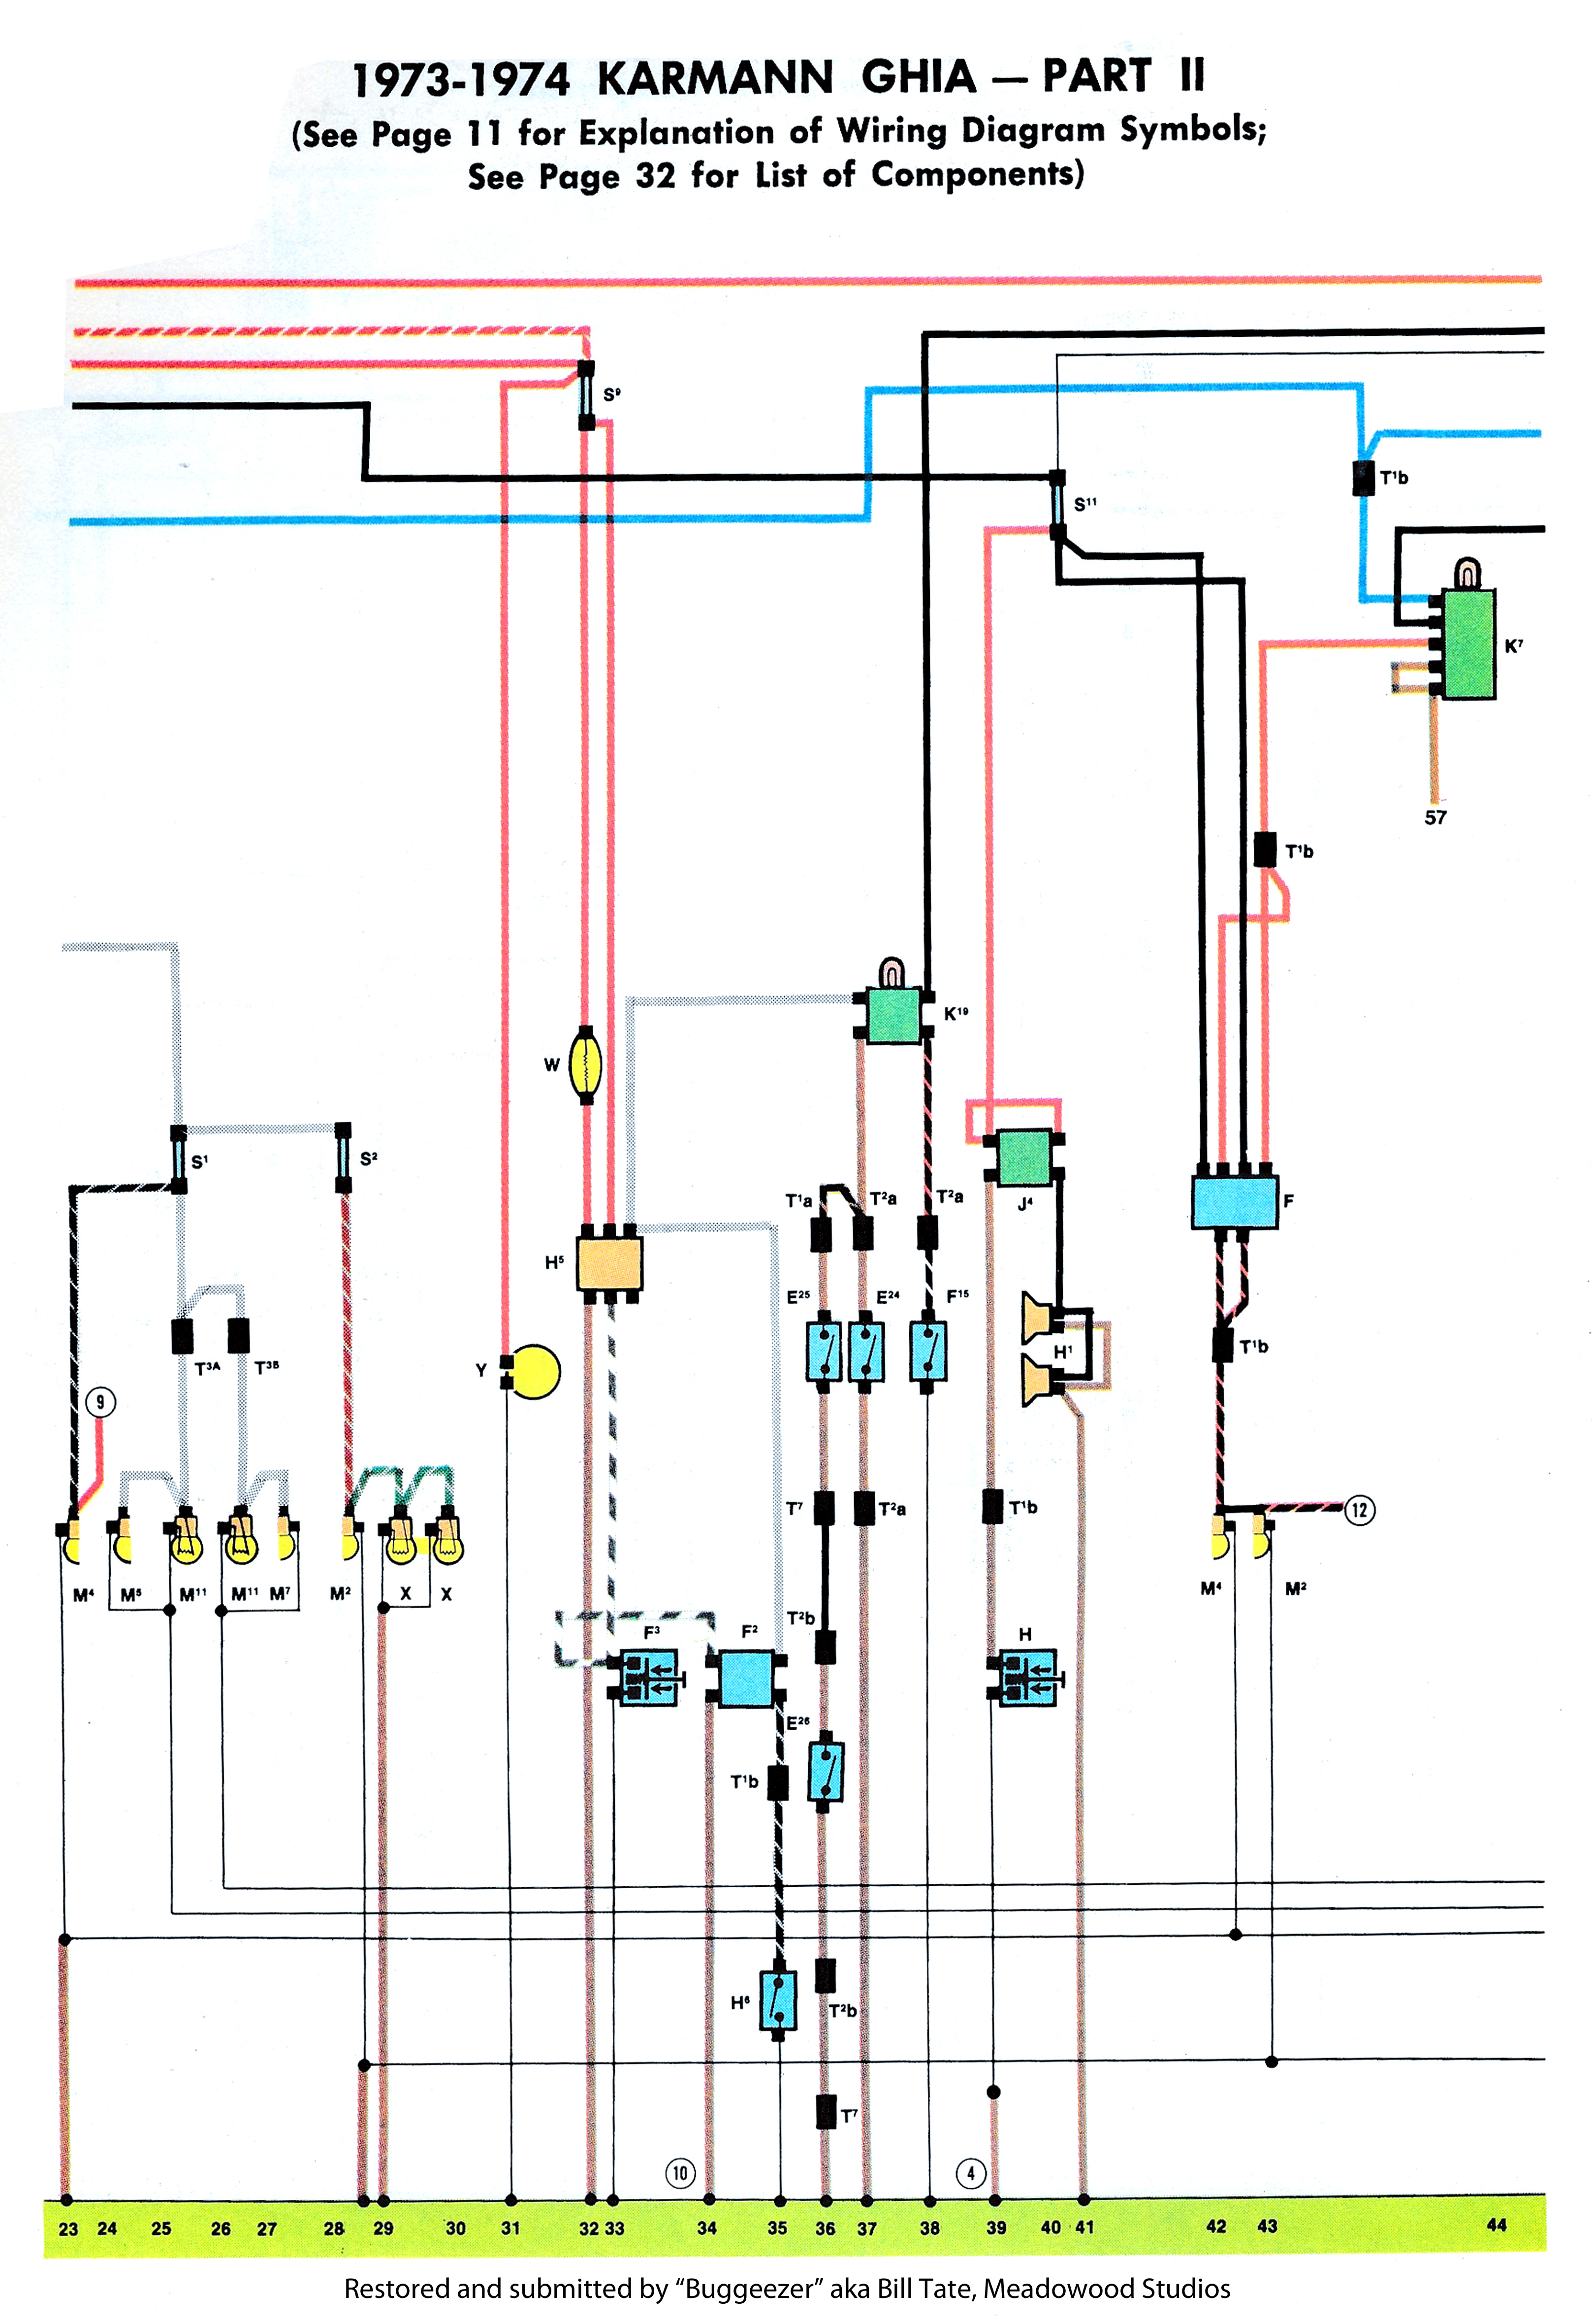
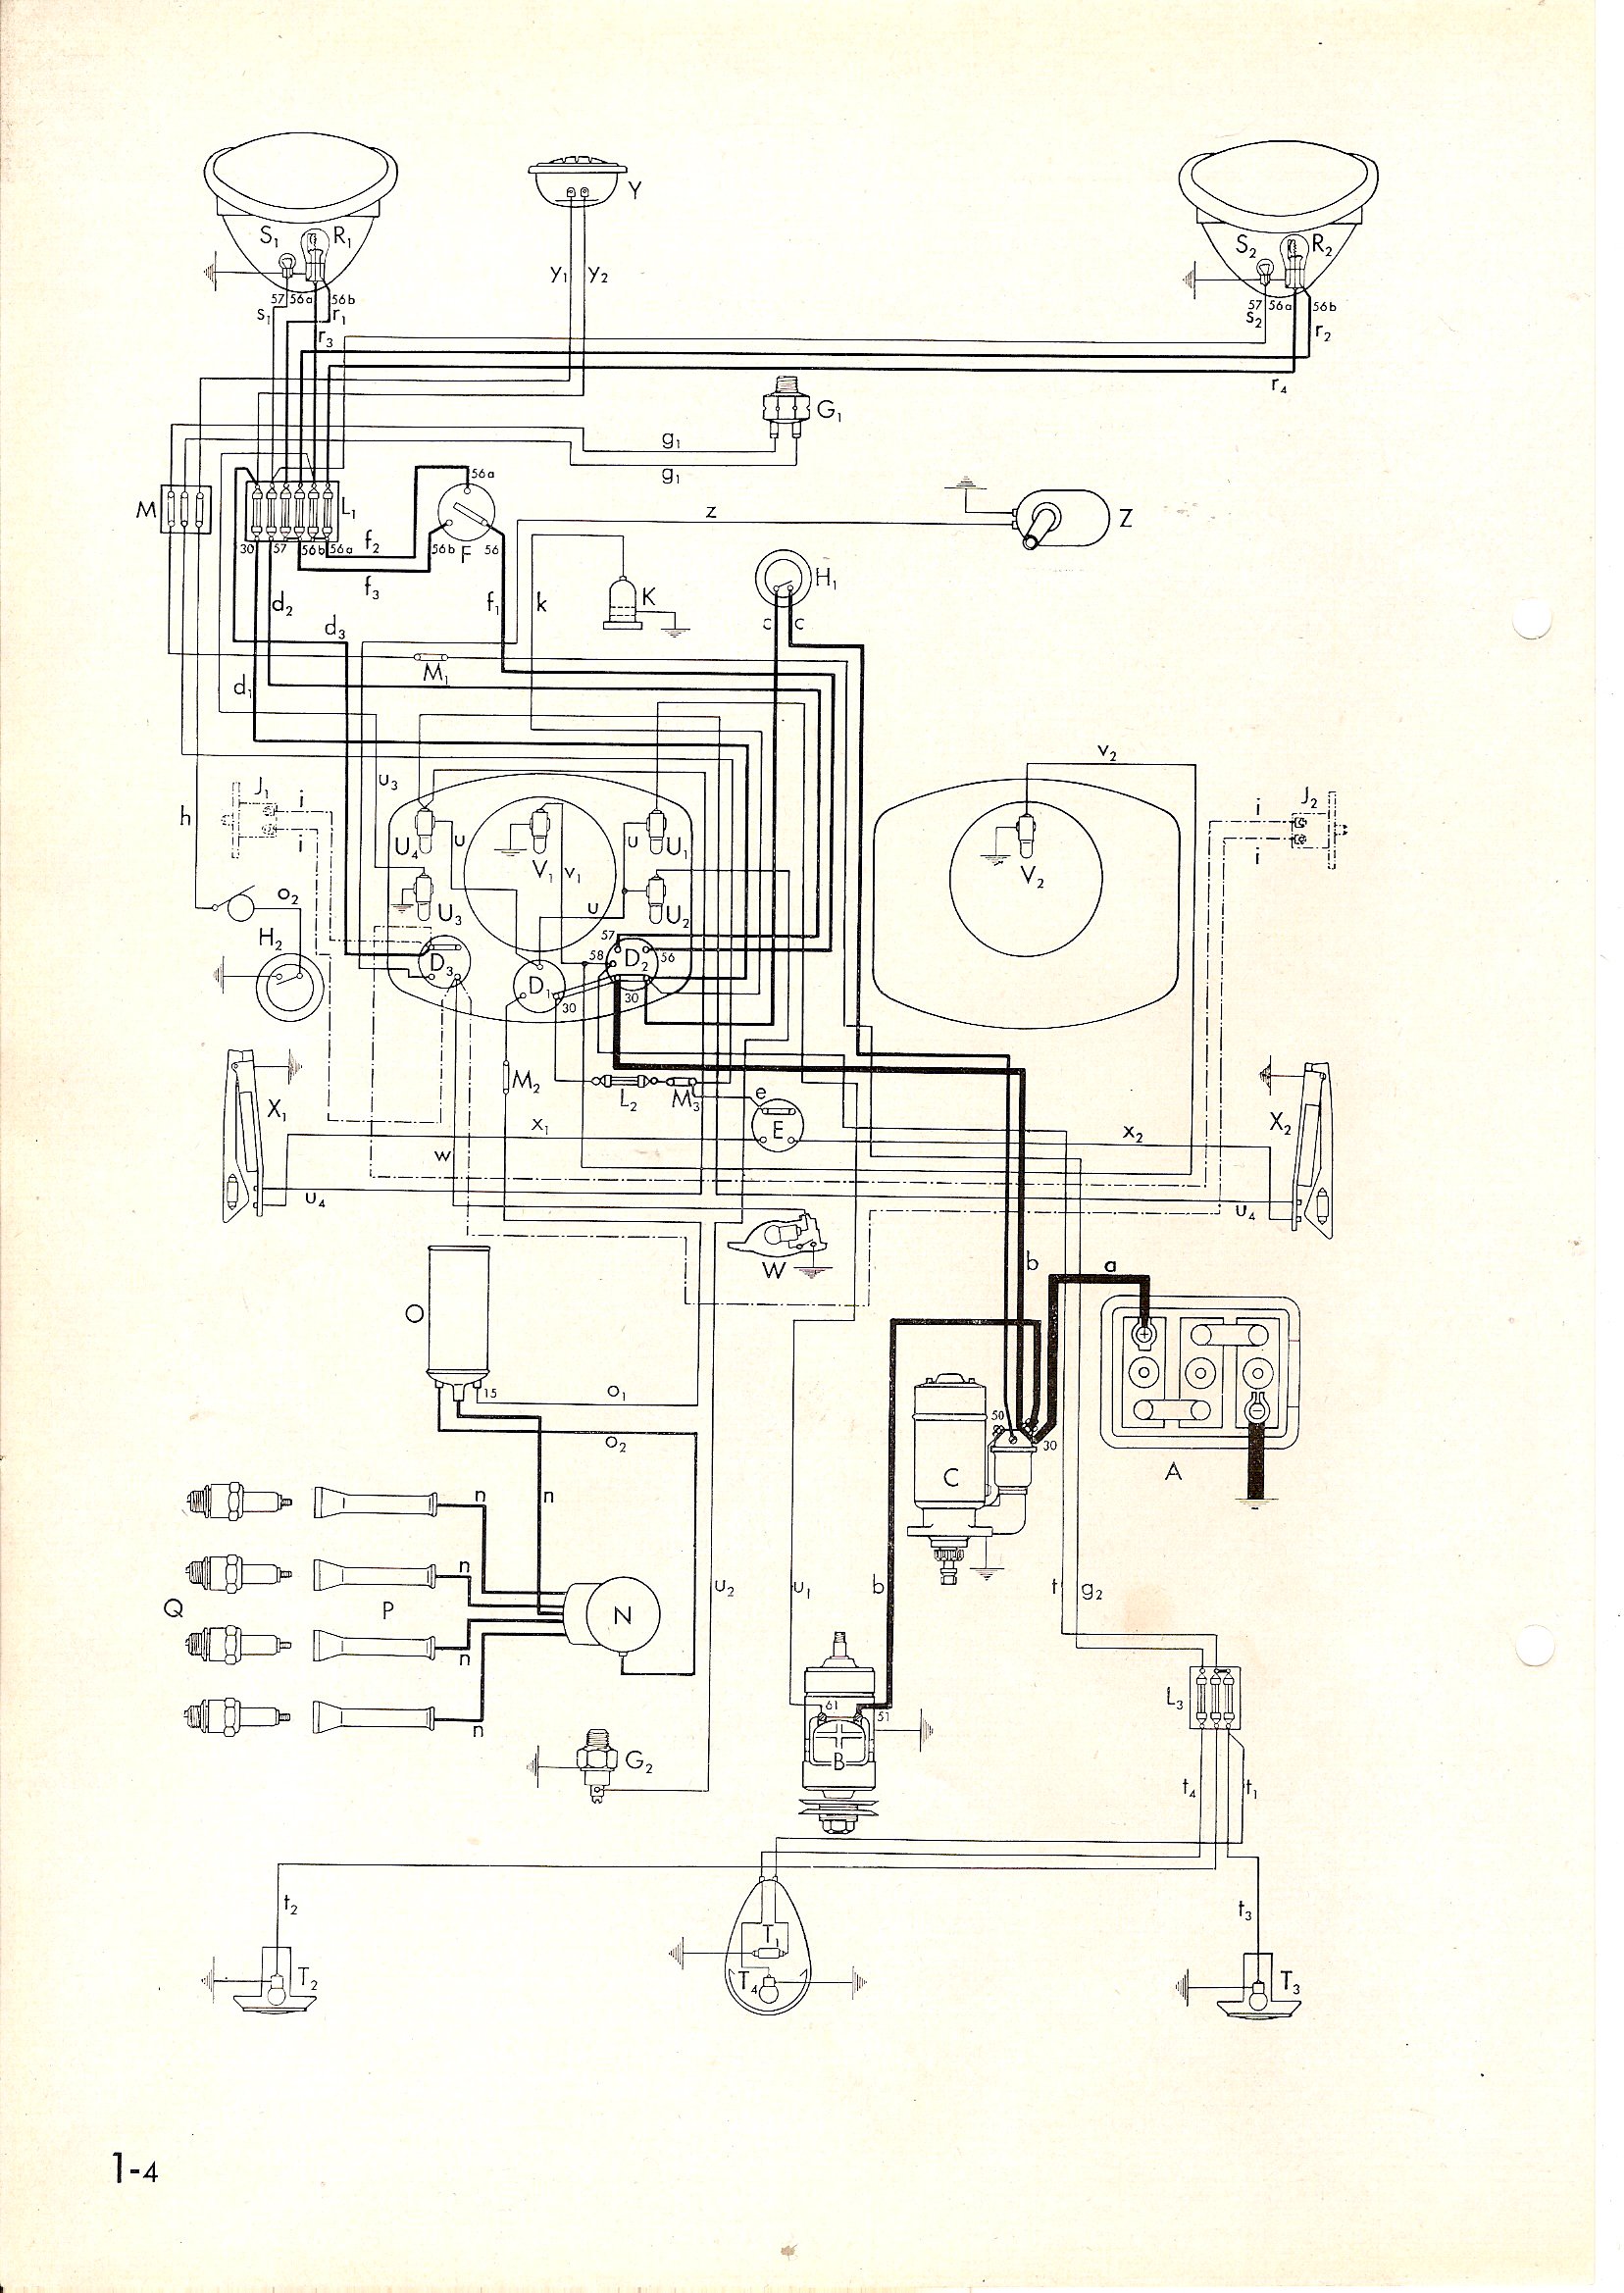
Thesamba Com Karmann Ghia Wiring Diagrams
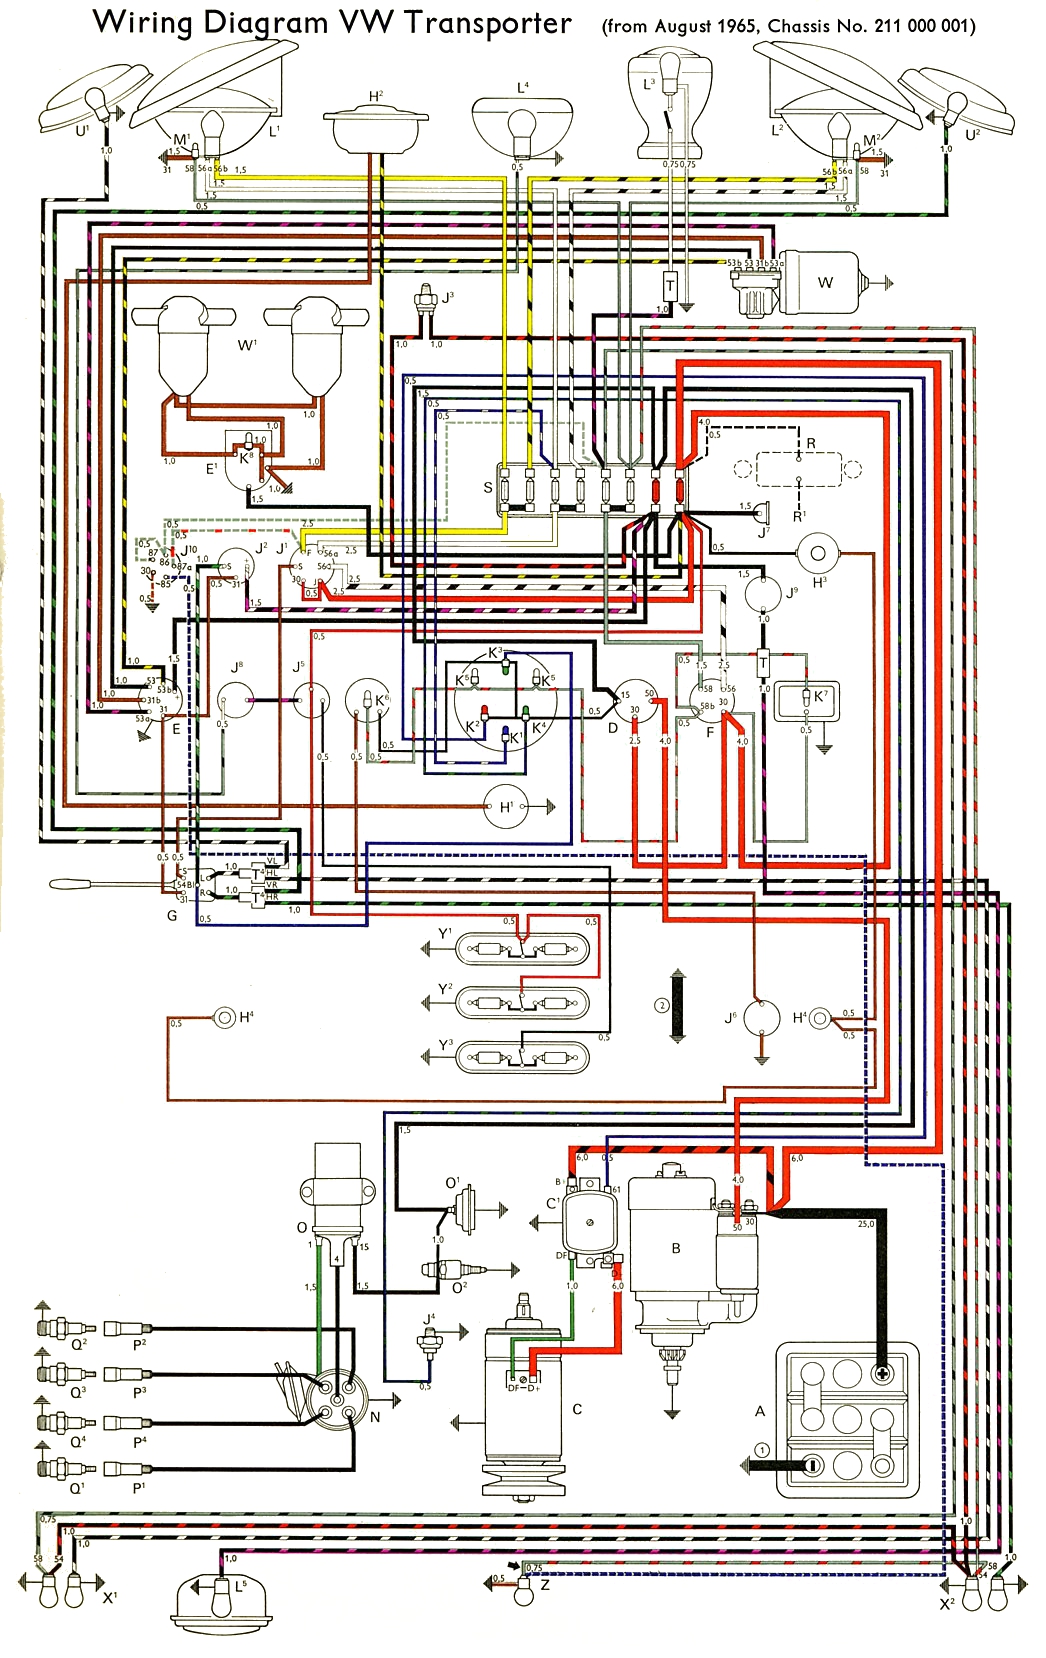
Thesamba Com Type 2 Wiring Diagrams


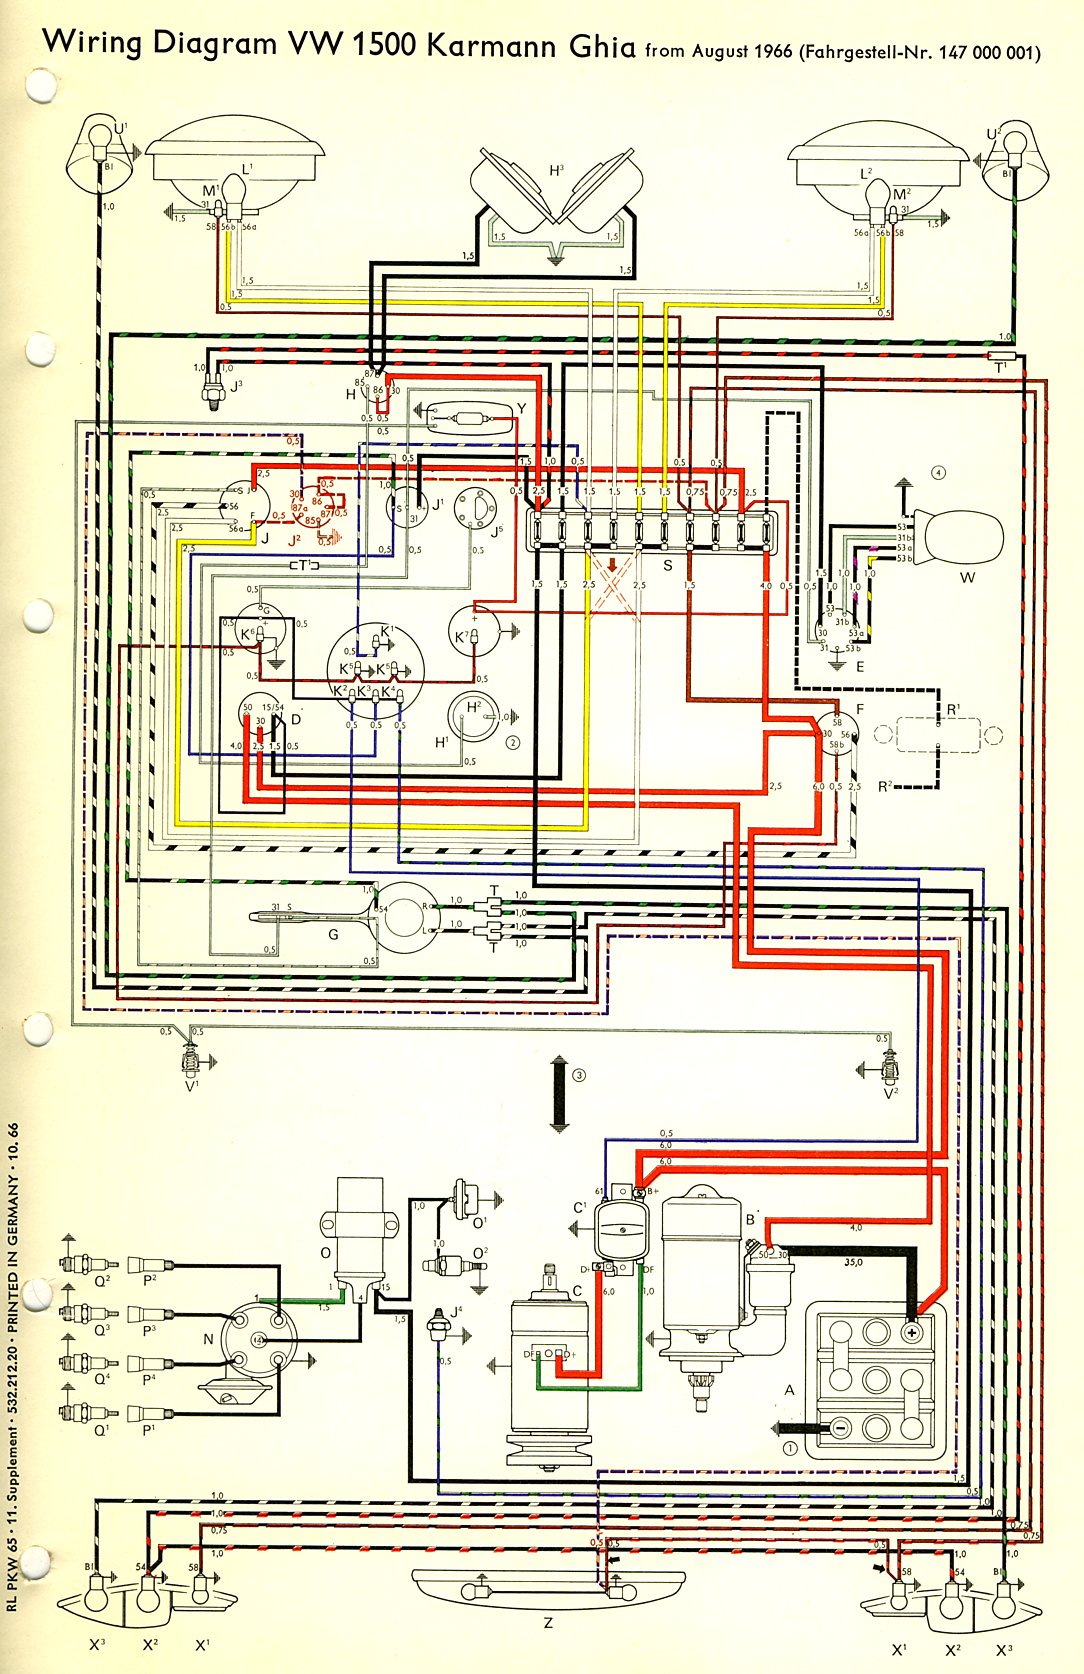
Thesamba Com Karmann Ghia Wiring Diagrams

Wiring Diagrams

76 Cb500t Wiring Diagram

Repair Guides
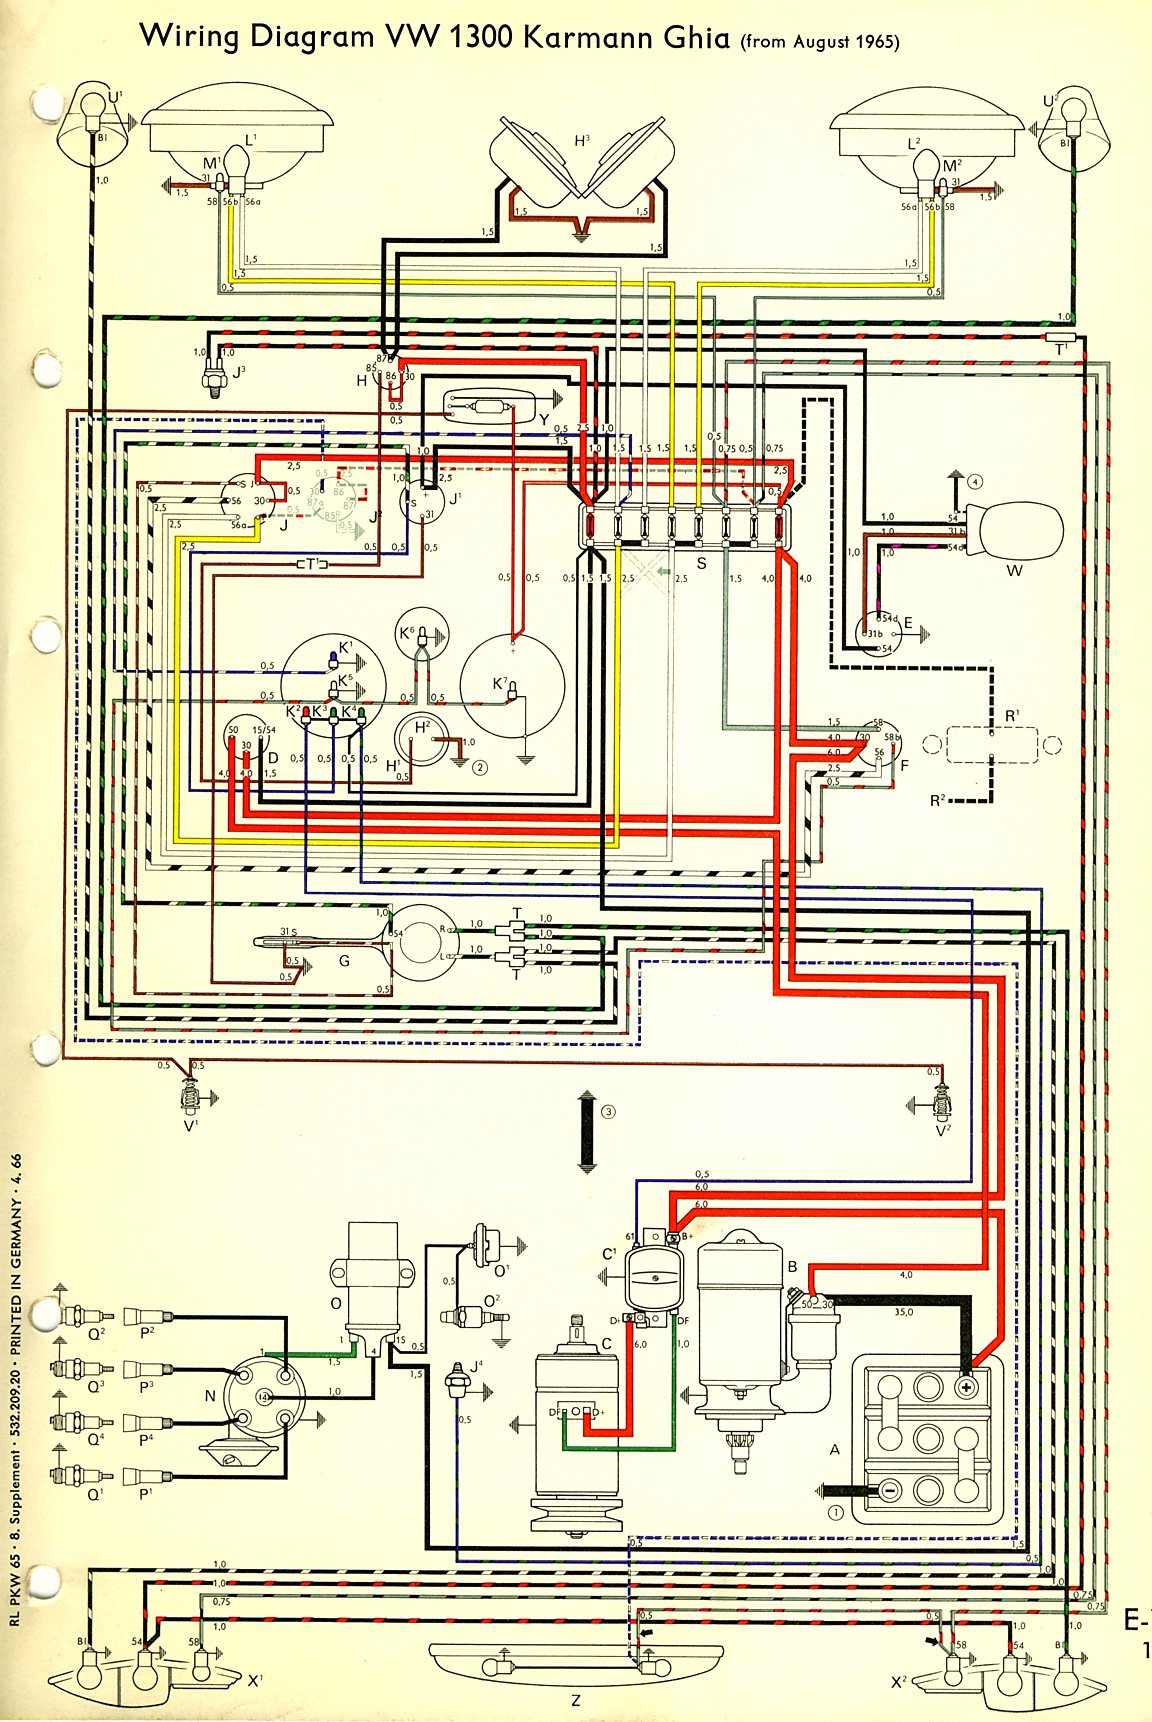
Thesamba Com Karmann Ghia Wiring Diagrams
Electrical Wiring
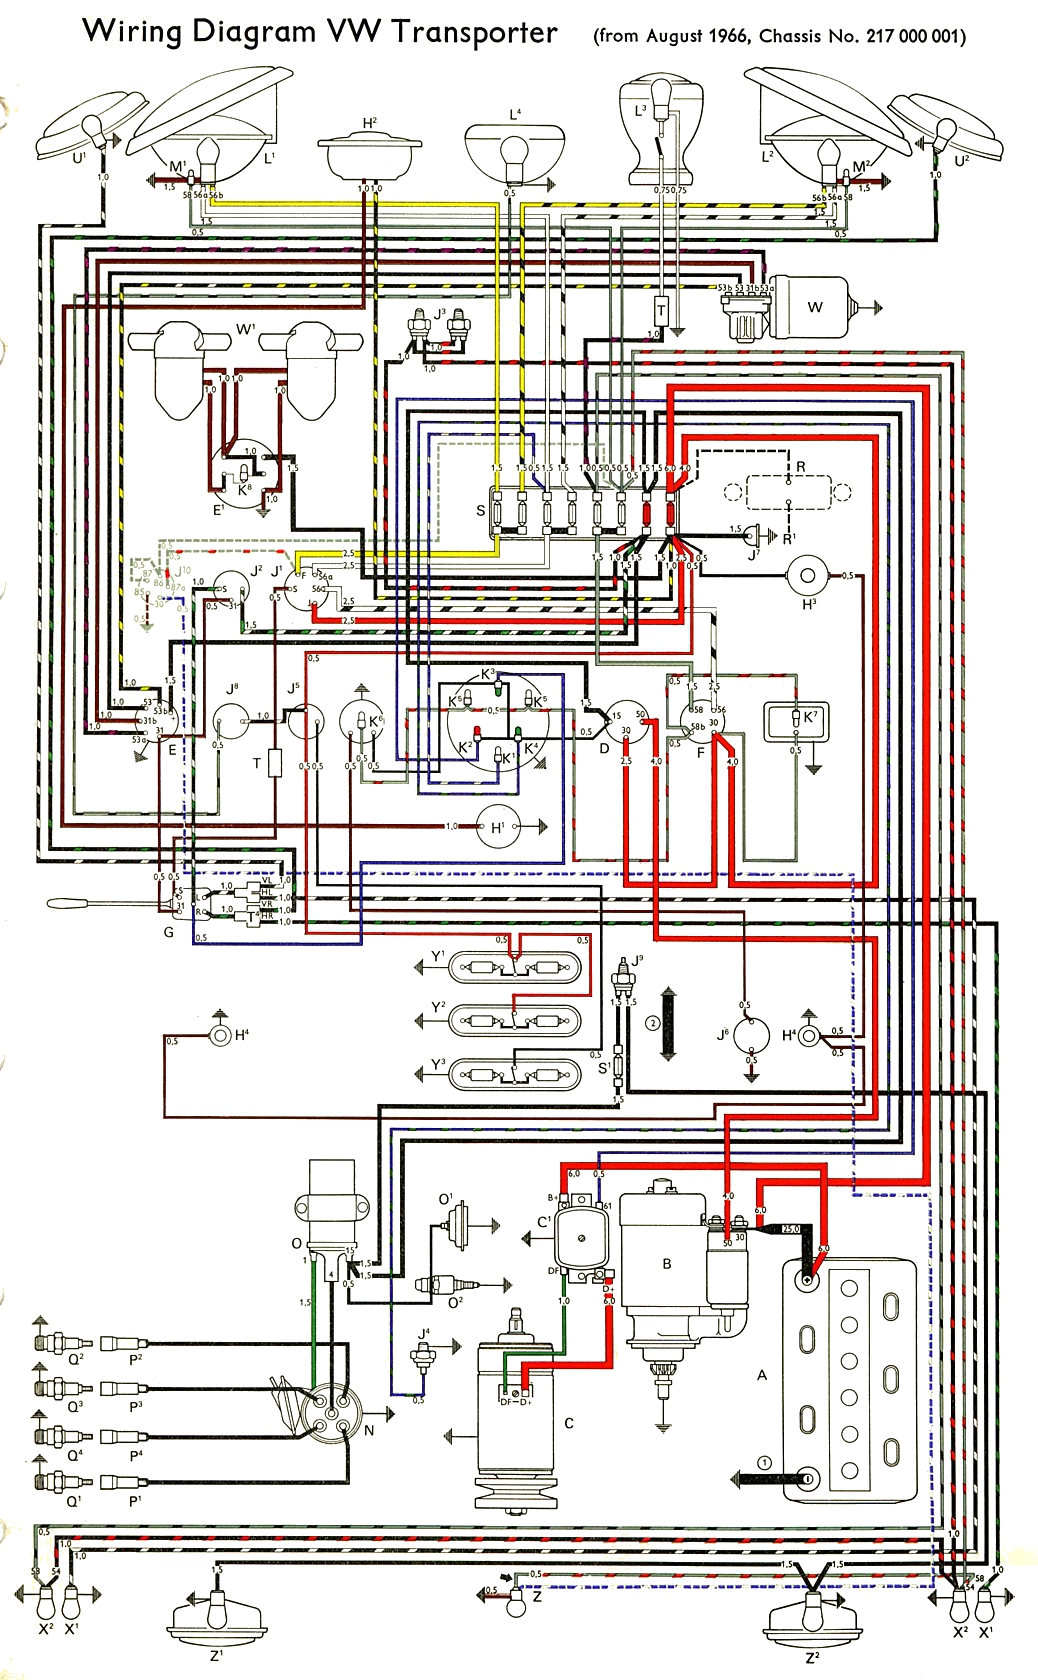
Thesamba Com Type 2 Wiring Diagrams
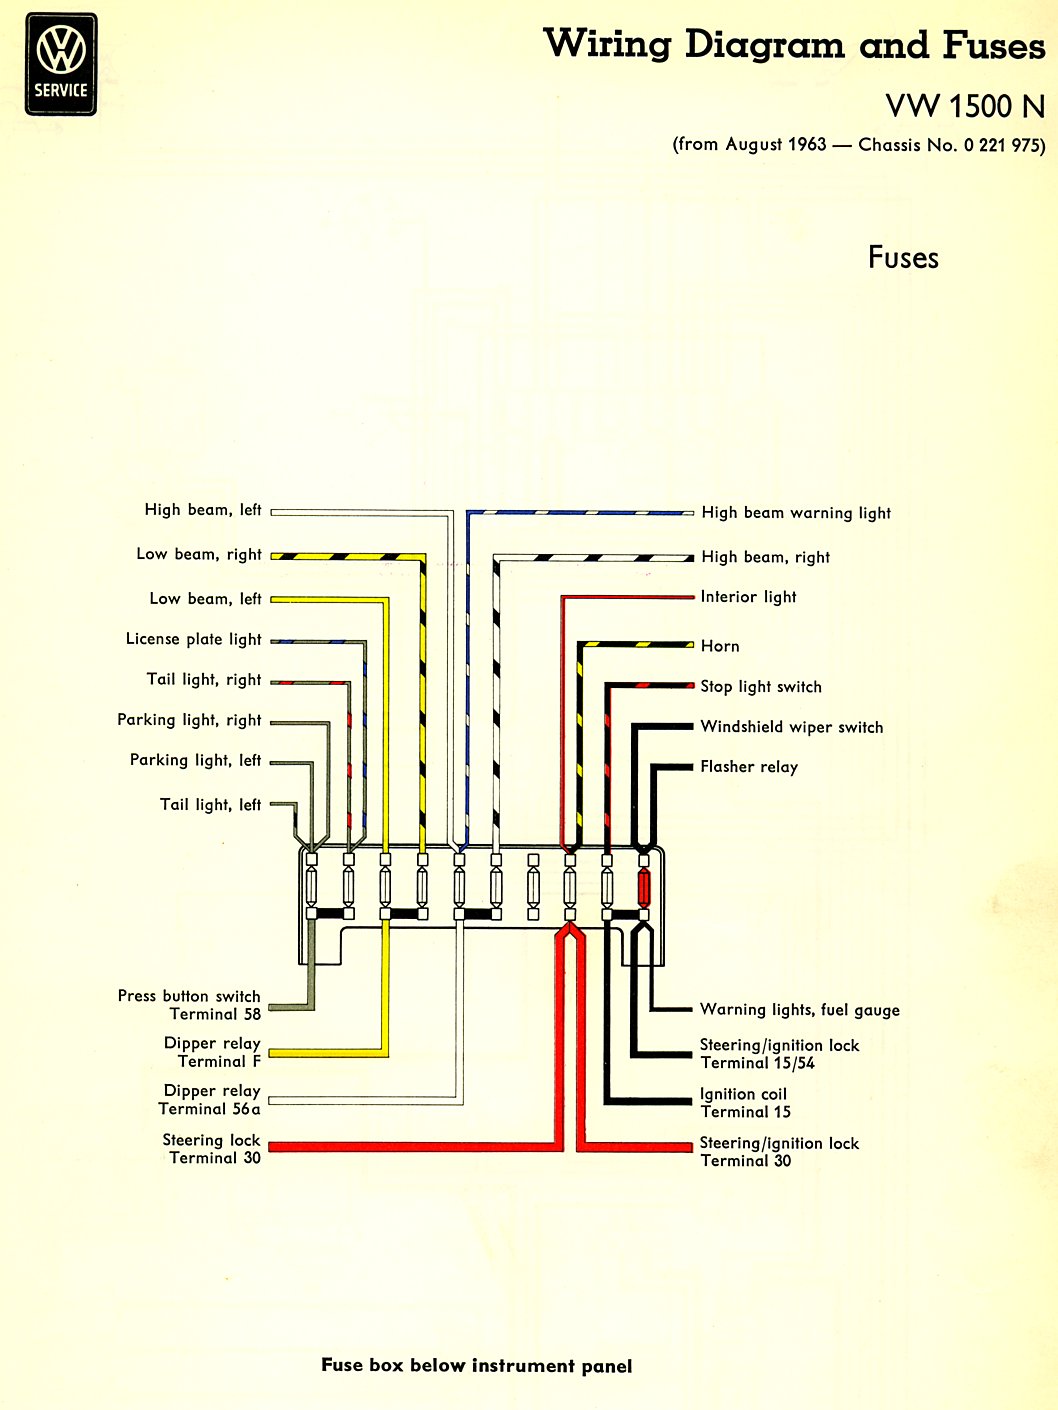
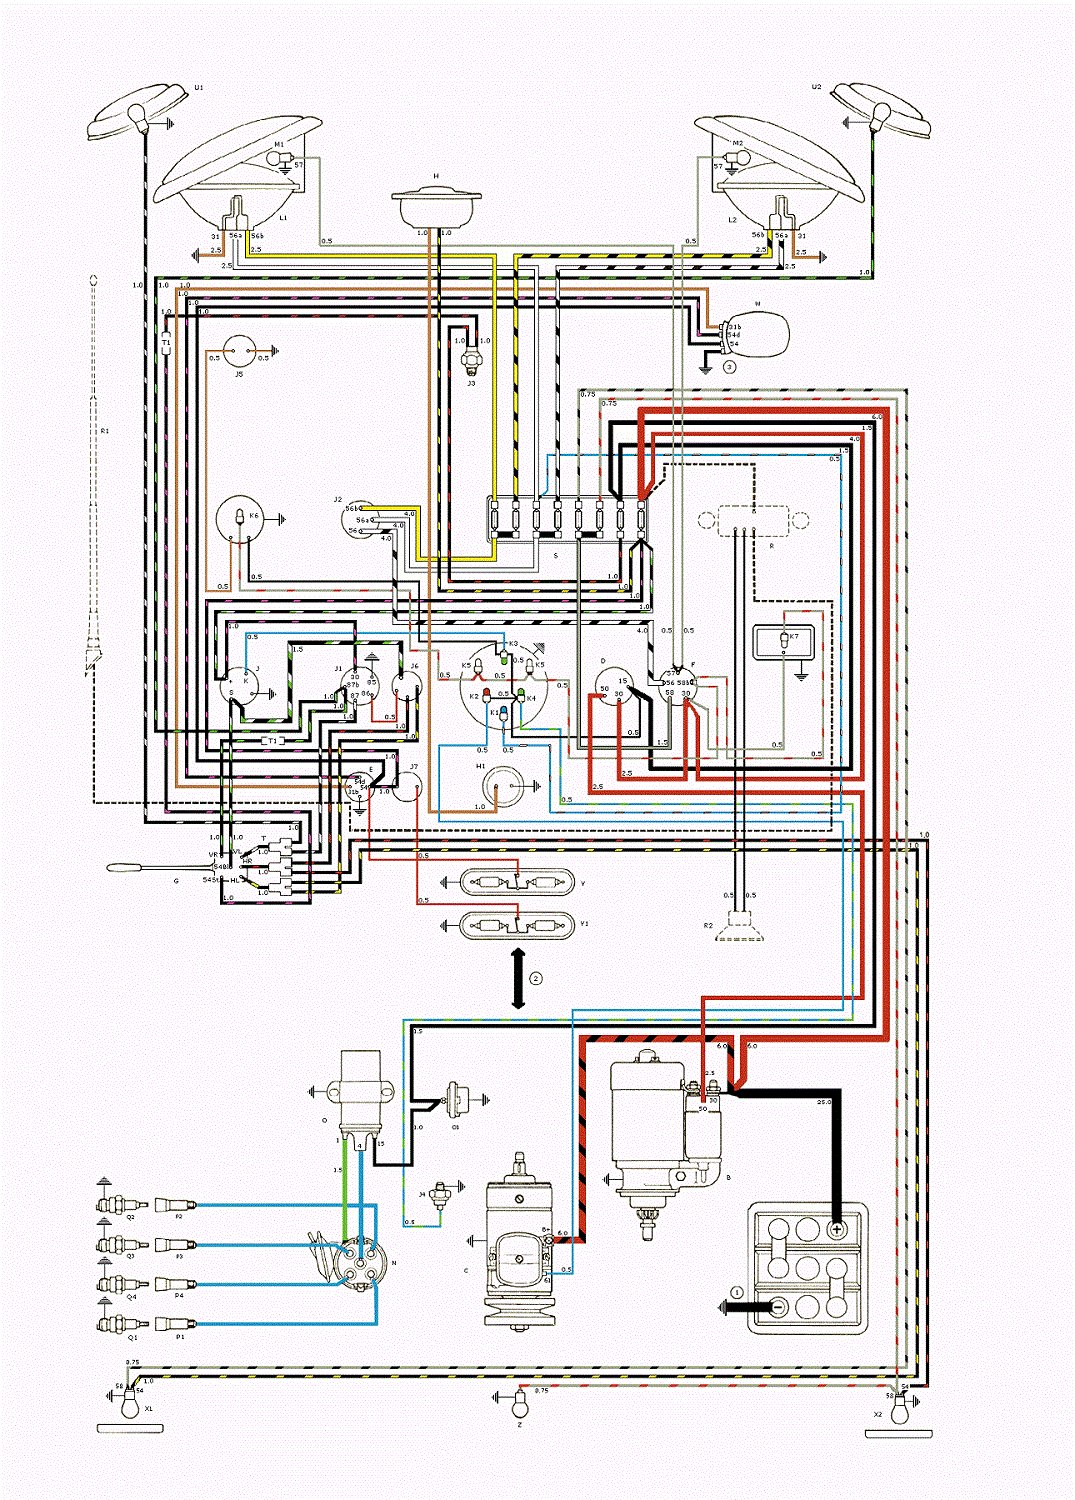
Thesamba Com Type 3 Wiring Diagrams
Step By Step Guide Understanding Motorcycle Wiring
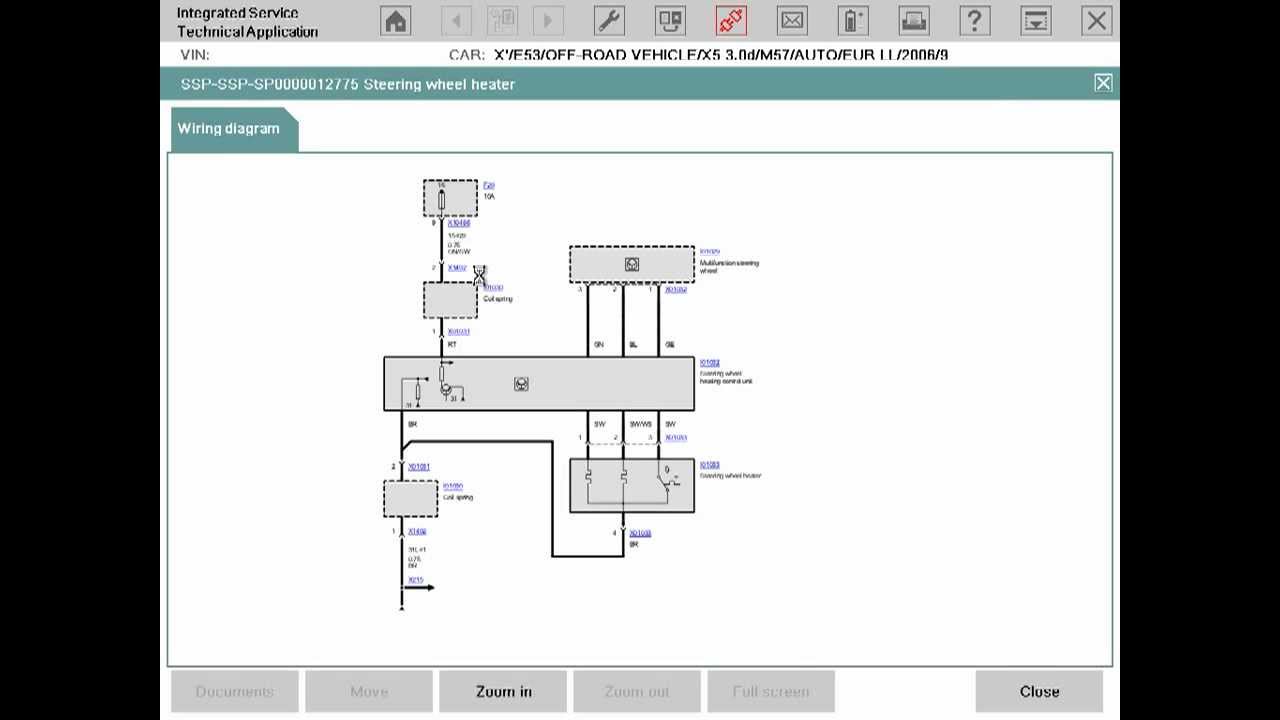
Wiring Diagram Function Of Bmw Icom Isid Software

Repair Guides

1988 Mustang 5 0 Wiring Diagrams
Thesamba Com Type 1 Wiring Diagrams


Where Do I Get Wiring Diagrams From The Answer Is One

Repair Guides


Repair Guides
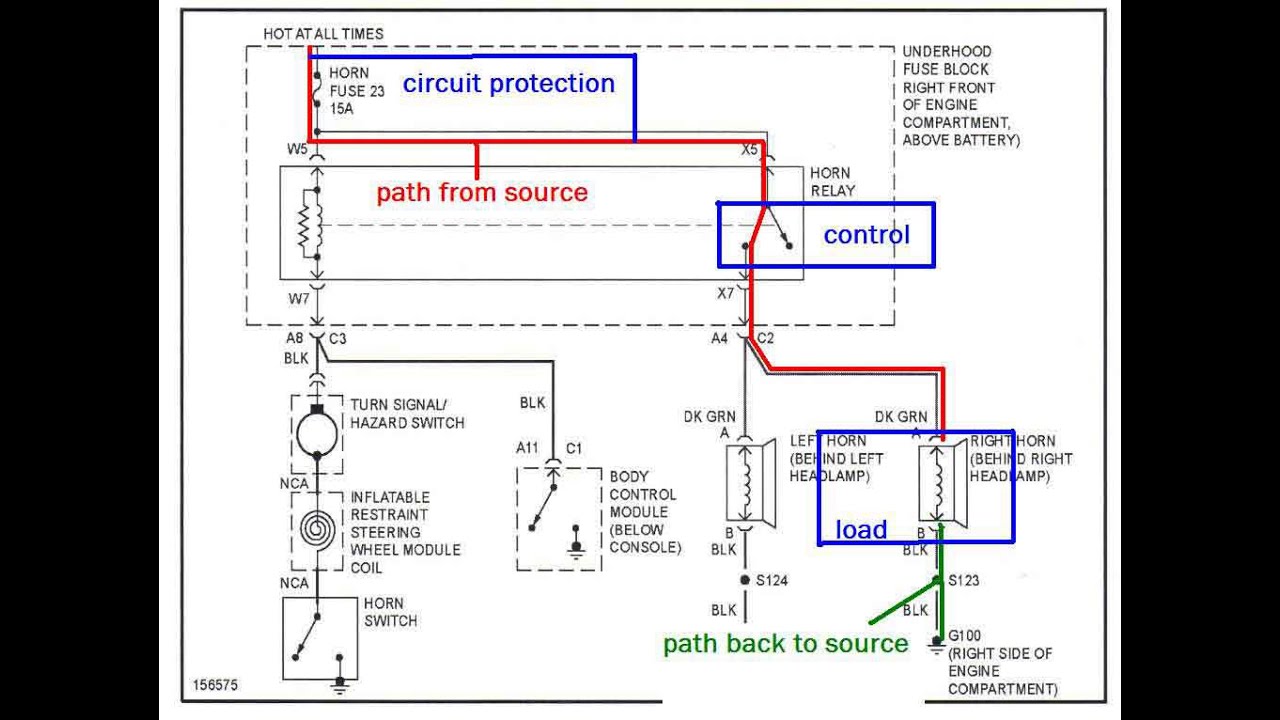
The Trainer 32 How To Read An Automotive Block Wiring

Repair Guides

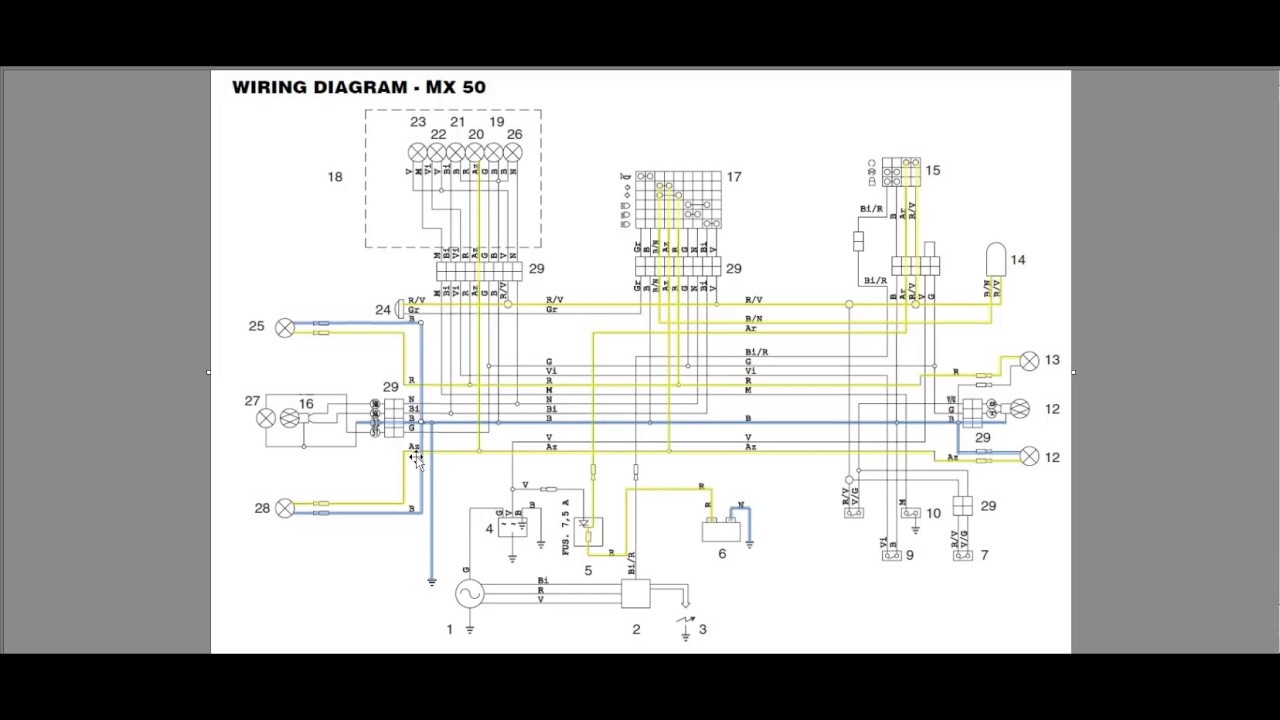
Puch Wiring Diagrams

Wiring Diagrams
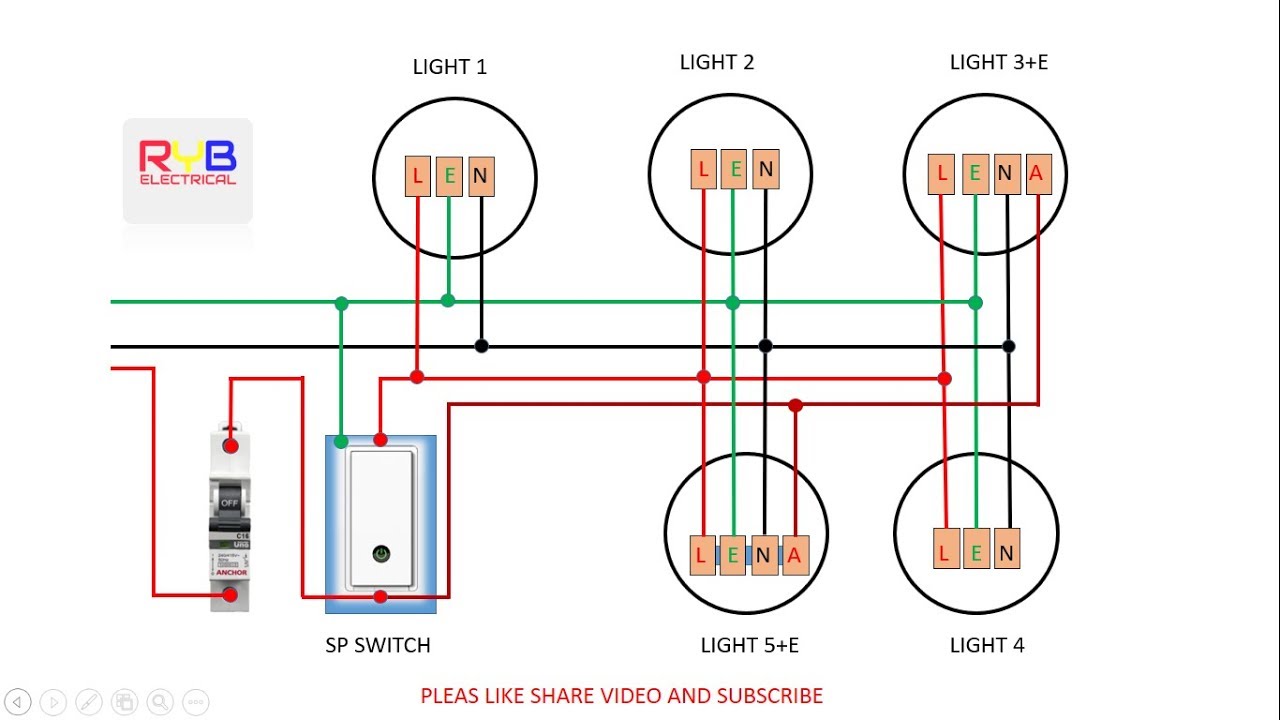
Emergency Light Switch Wiring Diagram

Thesamba Com Type 3 Wiring Diagrams


Repair Guides


1964 Ranchero Wiring Diagrams

Repair Guides

Thesamba Com Type 2 Wiring Diagrams
Home

Evan Fell Motorcycle Works U2013 My Name Is Evan And My Hobby
Thesamba Com Type 3 Wiring Diagrams


Amelia Squariel Motorcycle Wiring

Wiring Diagrams 911 December 2011
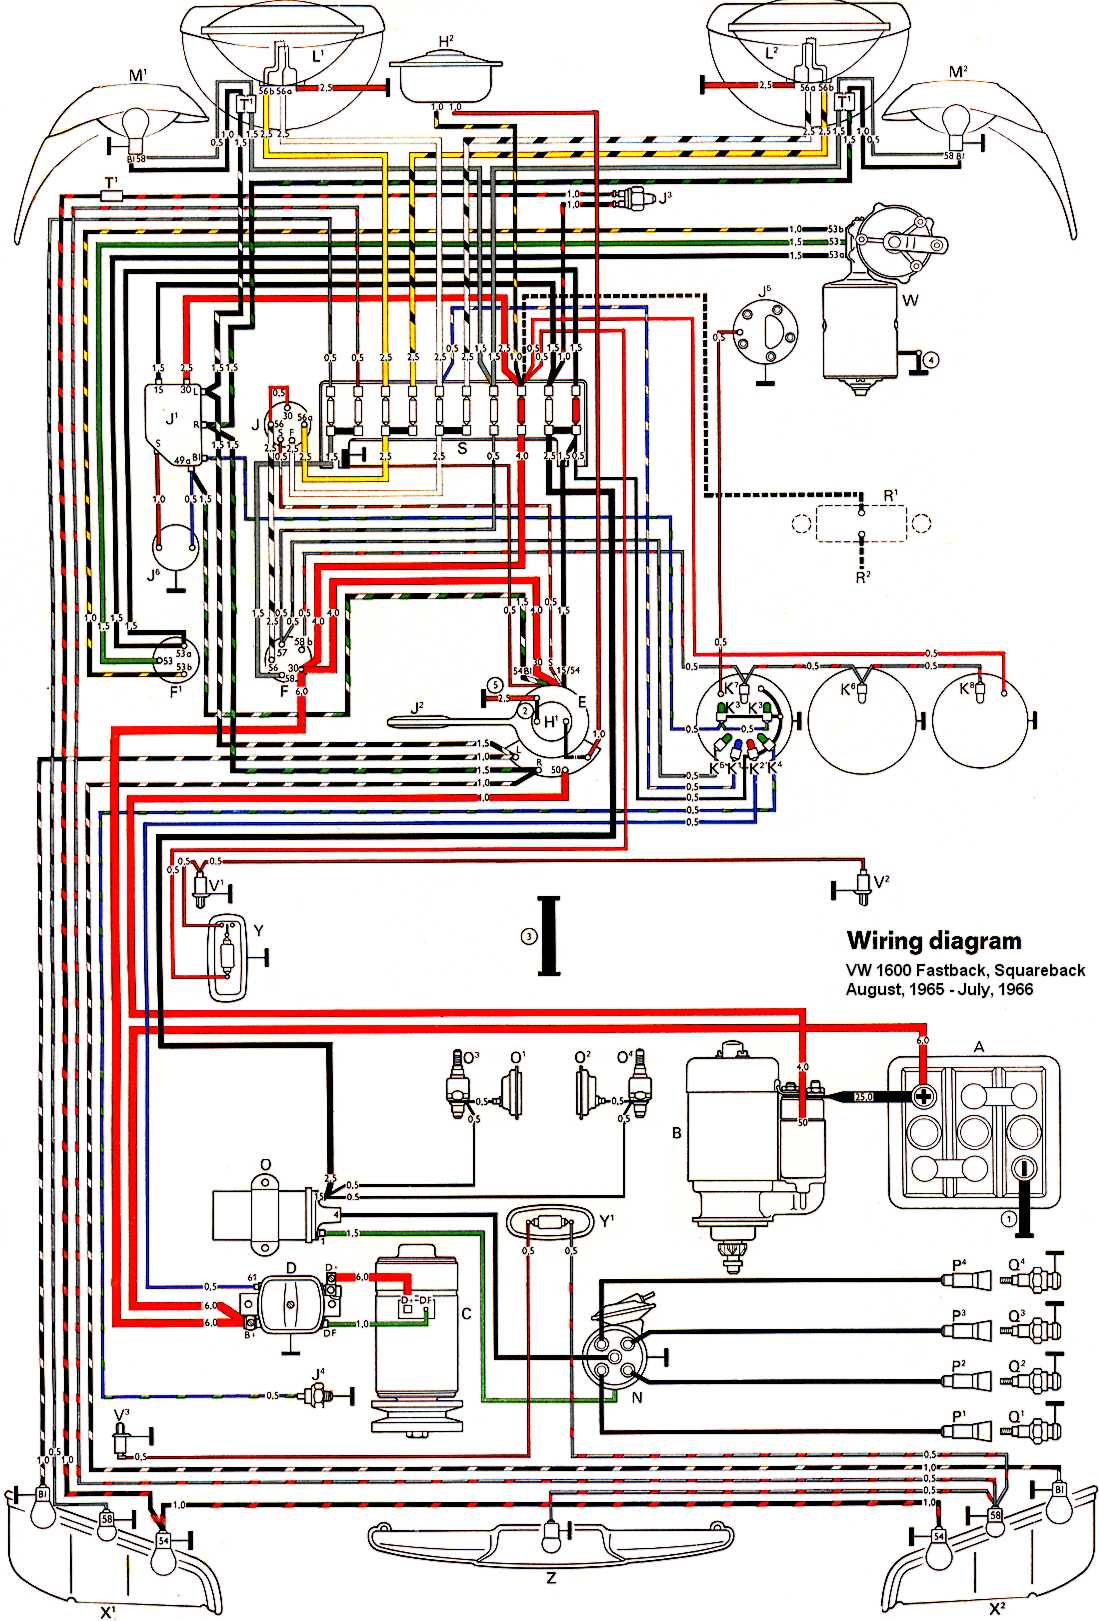
Thesamba Com Type 3 Wiring Diagrams

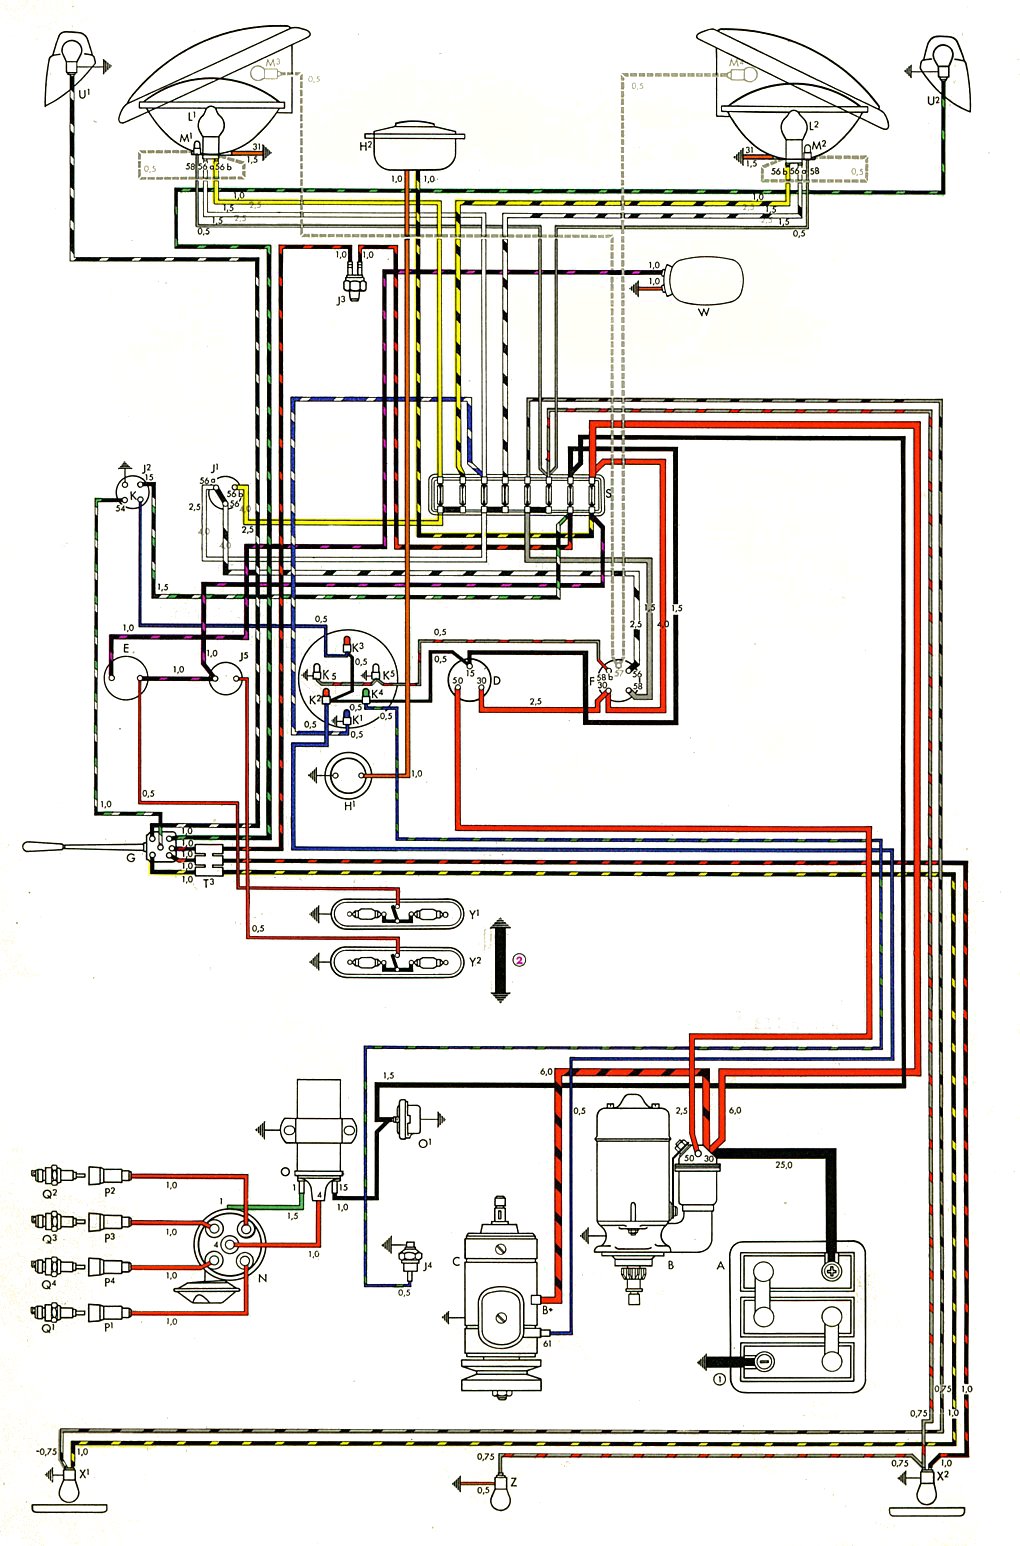
Thesamba Com Type 2 Wiring Diagrams

Thesamba Com Type 2 Wiring Diagrams
Diagram Multiplexer Wiring Diagram
Download Multiplexer Wiring Diagram
Verify that fence, top to bottom, lies flat against side of blade. If it does not, adjust the set screws (A, Figure 5 25) until fence is parallel to blade along the vertical length of fence.
The JWBS 18 comes with a 3 4” blade so the tension should be set at 3 4” when using this blade. As you become familiar with the saw, you may find it necessary to change the blade tension from the initial setting.
The first is the blade guides—they offer tool less adjustment, so you can quickly adjust them as needed without digging out tools. The dual dust ports do a good job at capturing dust, and that’s not something you say about a bandsaw very often.
Large, independently adjustable guides are tool less to save you time on set up along with an added foot brake to stop continual blade movement. The Jet 18 in. steel frame bandsaw is engineered to build great projects through superior performance.
The pitch should not be smaller than necessary, as the feed speed is reduced if there are too many teeth working on the workpiece simultaneously, which causes the saw blade to wear more quickly.
Blade Installation: Choose a blade appropriate for your project (material and desired cut). Install the blade according to the user manual, ensuring proper tension and tracking.
The table is slotted for front blade removal and the guide post has a stress free magnetic door on the front for efficient blade changes. Large, independently adjustable guides are tool less to save you time on set up.
They make blades that last longer, cut smoother, and do every conceivable cutting job. Toward this end they have continually invested in better research and development.
Large, independently adjustable guides are tool less to save you time on set up along with an added foot brake to stop continual blade movement. The JET 18” steel frame bandsaw is engineered to build great projects through superior performance.
The JET JWBS 18SFX is a versatile and reliable 18" bandsaw designed to meet the needs of both amateur and professional woodworkers. It features a 1.75HP motor powered by a standard 115V outlet, providing ample power for a wide range of woodworking tasks.
3 way switch,3 way switch wiring,3 way switch wiring diagram pdf,3 way wiring diagram,3way switch wiring diagram,4 prong dryer outlet wiring diagram,4 prong trailer wiring diagram,6 way trailer wiring diagram,7 pin trailer wiring diagram with brakes,7 pin wiring diagram,alternator wiring diagram,amp wiring diagram,automotive lighting,cable harness,chevrolet,diagram,dodge,doorbell wiring diagram,ecobee wiring diagram,electric motor,electrical connector,electrical wiring,electrical wiring diagram,ford,fuse,honeywell thermostat wiring diagram,ignition system,kenwood car stereo wiring diagram,light switch wiring diagram,lighting,motor wiring diagram,nest doorbell wiring diagram,nest hello wiring diagram,nest labs,nest thermostat,nest thermostat wiring diagram,phone connector,pin,pioneer wiring diagram,plug wiring diagram,pump,radio,radio wiring diagram,relay,relay wiring diagram,resistor,rj45 wiring diagram,schematic,semi-trailer truck,sensor,seven pin trailer wiring diagram,speaker wiring diagram,starter wiring diagram,stereo wiring diagram,stereophonic sound,strat wiring diagram,switch,switch wiring diagram,telecaster wiring diagram,thermostat wiring,thermostat wiring diagram,trailer brake controller,trailer plug wiring diagram,trailer wiring diagram,user guide,wire,wire diagram,wiring diagram,wiring diagram 3 way switch,wiring harness
