
Digital Speedometer Wiring Diagram
- Category : Wiring Diagram
- Post Date : January 22, 2026
Digital Speedometer Wiring Diagram
My Smarftcraft Speedometer Is Not Working The Neddle Does Not Move

Blog

Speedometer Wiring Diagram
How To Install Auto Meter Programmable Speedometer Gauge - 0-160 Mph - Electrical

Speedometers Speedometers Gps Speed Sensor Vdo Gps Speedometer With Gps Sensor Sending Unit

Thesamba Com View Topic
Tas Automotive Gps Speedometer
Dakota Digital Speedometer Wiring Diagram

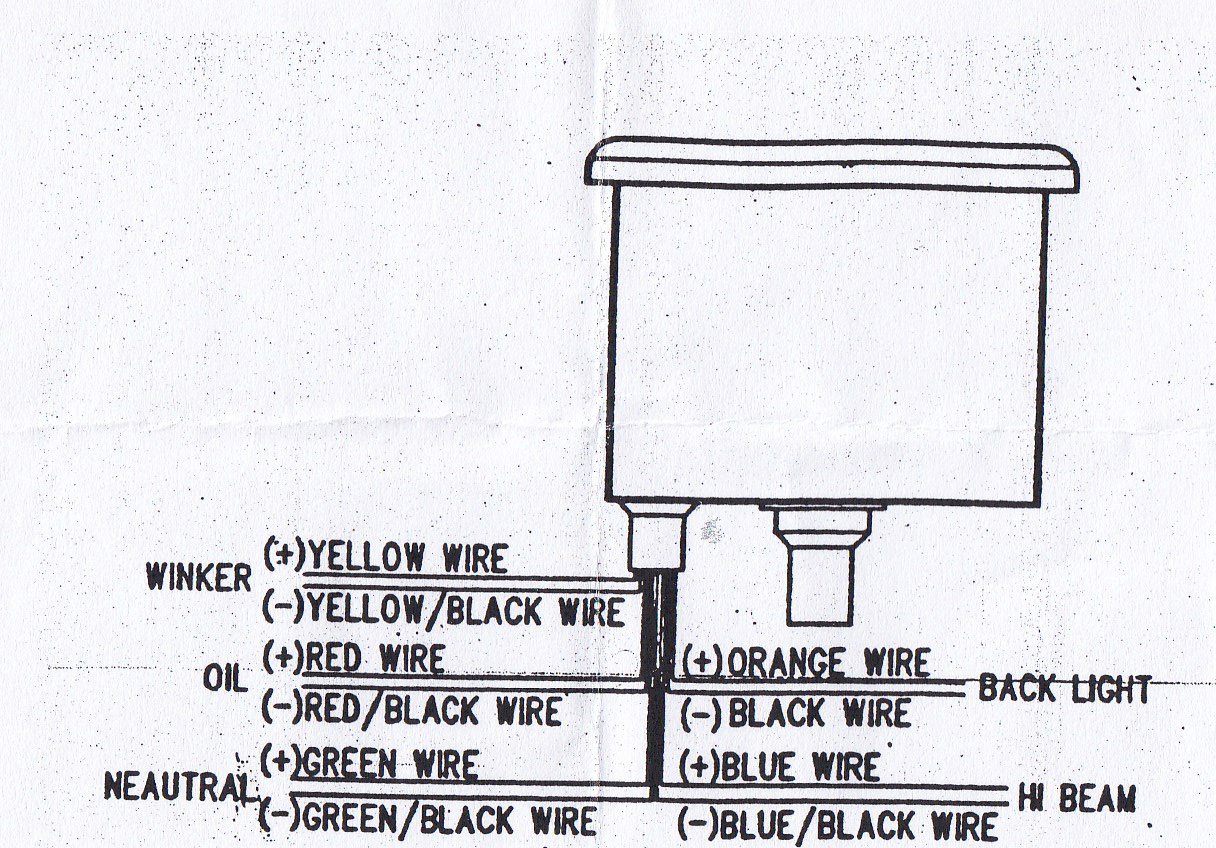
Wiring Diagram Of Motorcycle

Wiring Diagram Of Motorcycle
Cruiser Courier Cb Radio Mic Wiring
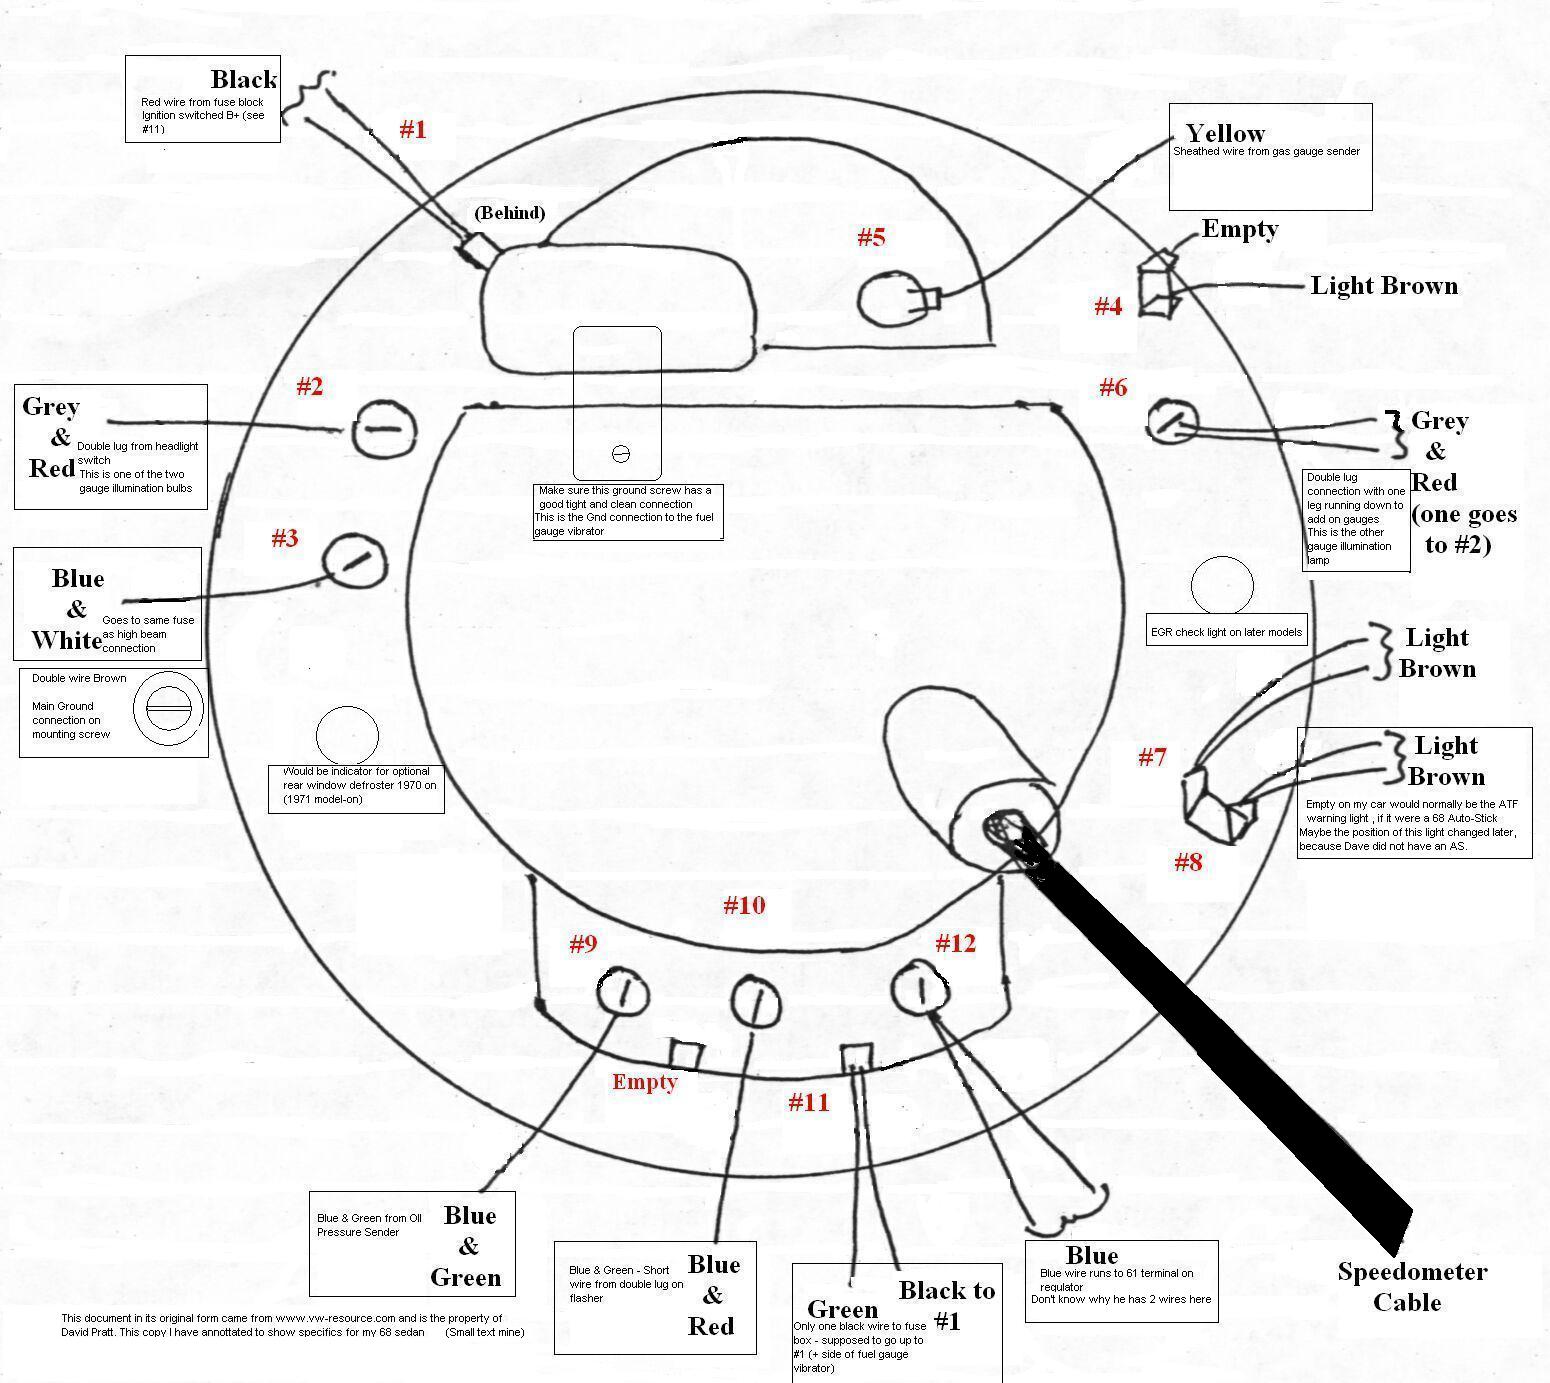
Thesamba Com Beetle - Late Model Super - 1968-up - View Topic
If You Have 06
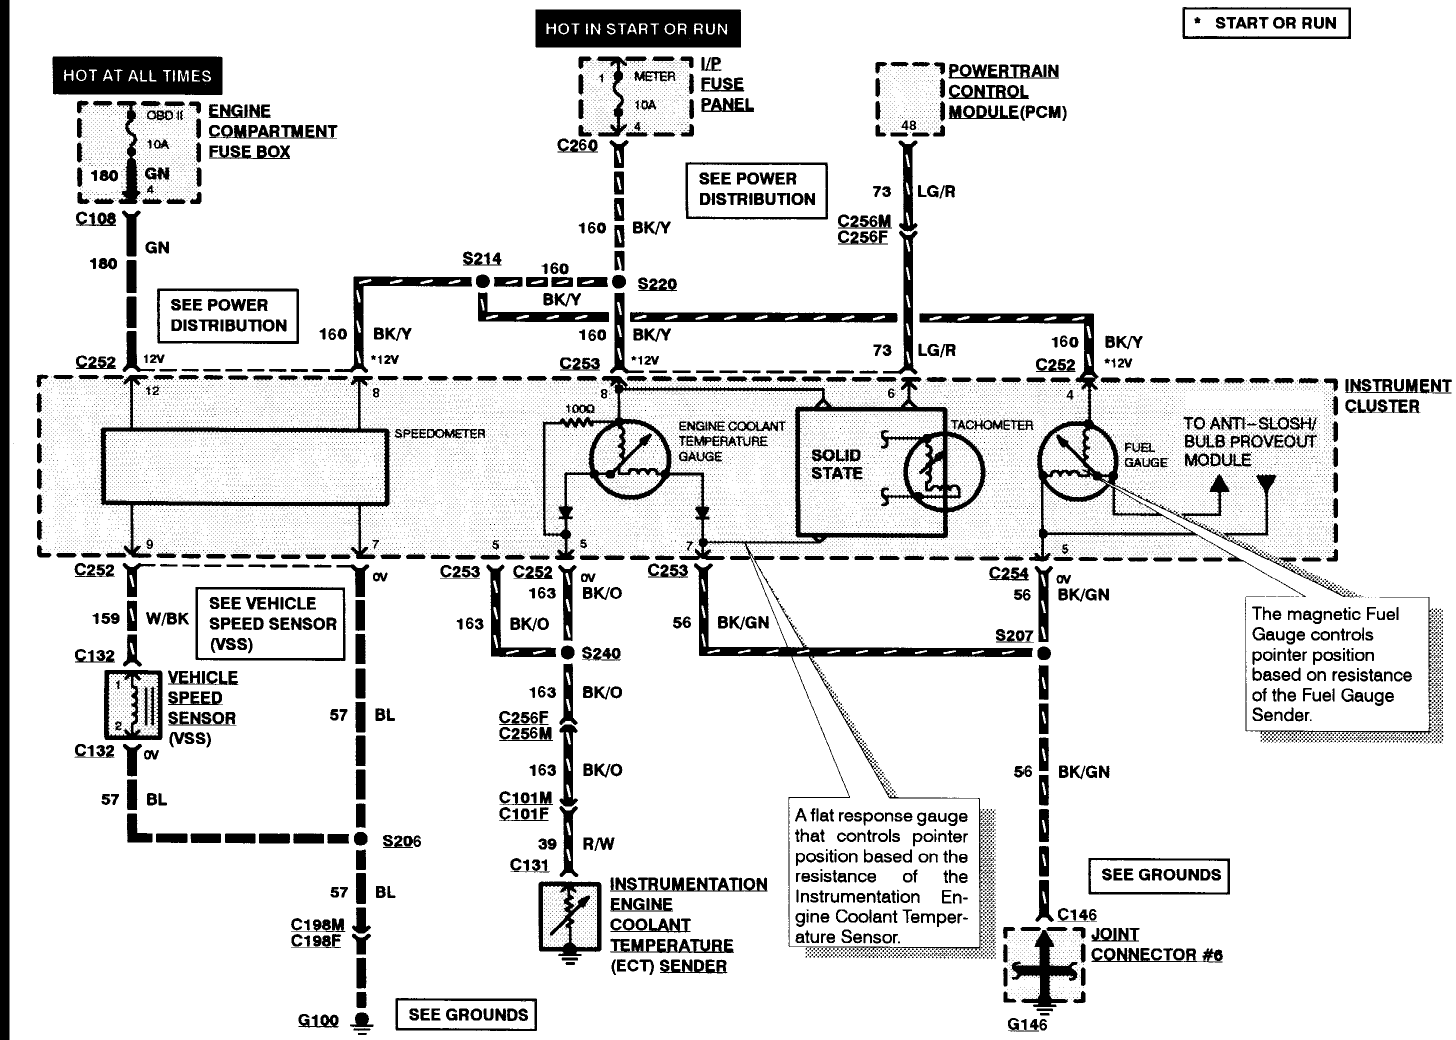
Schematics And Diagrams 1998 Mercury Tracer Speedometer Fuse
Autometer Speedometer One Input Terminal - Ls1tech

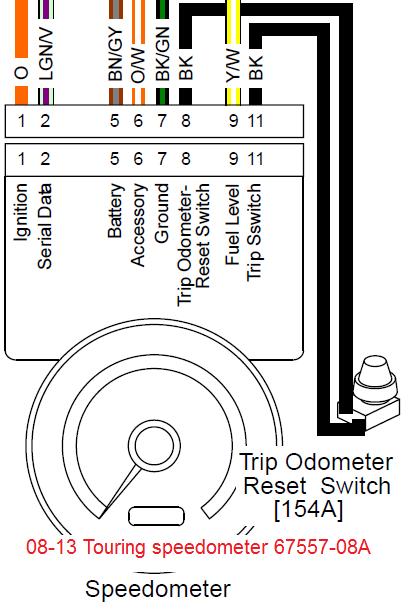
Mini Electronic Speedometer With Black Interface And Odometer Harley

W460 Speedometer Wiring Diagram

Speedometer Wiring Diagram U2013 Volovets Info

Speedometer Gauge Wiring Diagram

Wiring Nova-mmb Speedo
Speedo Wiring Resource
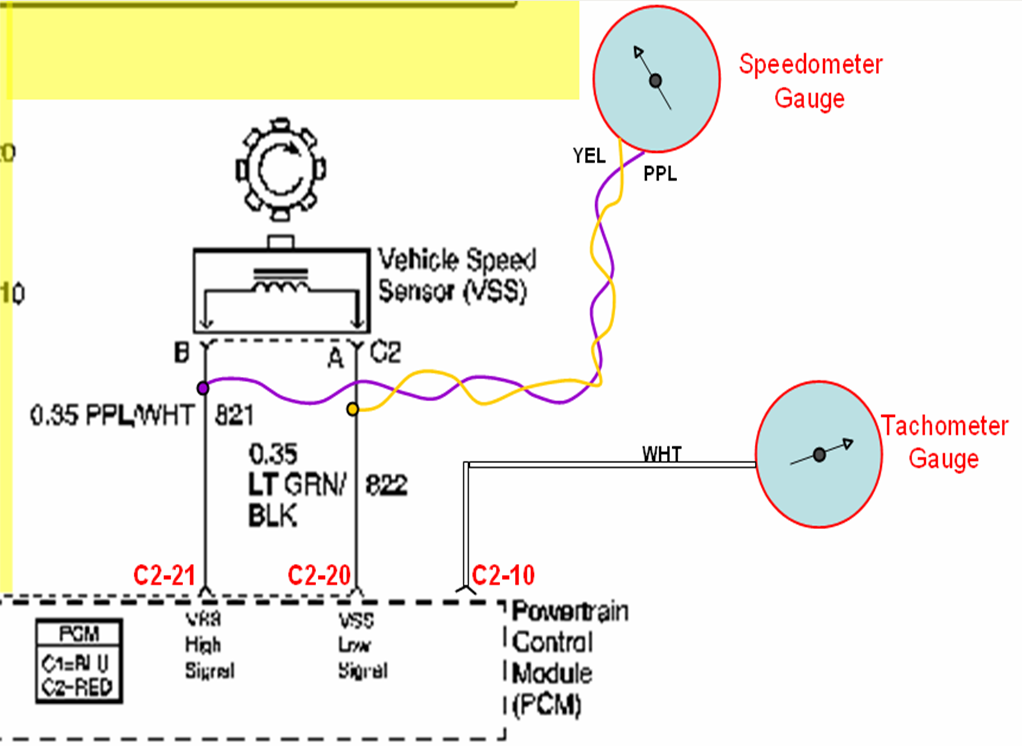
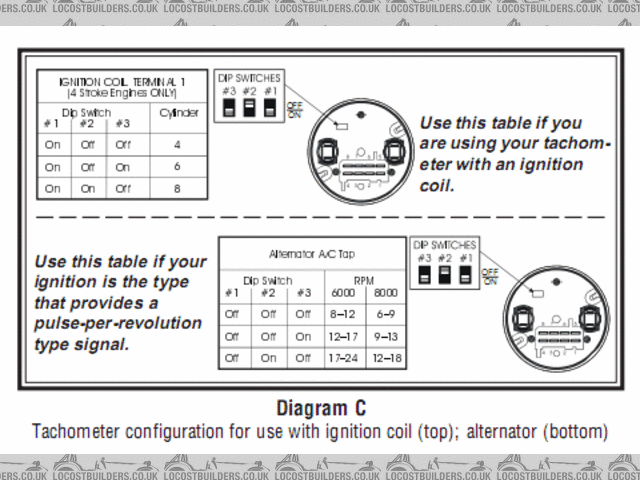
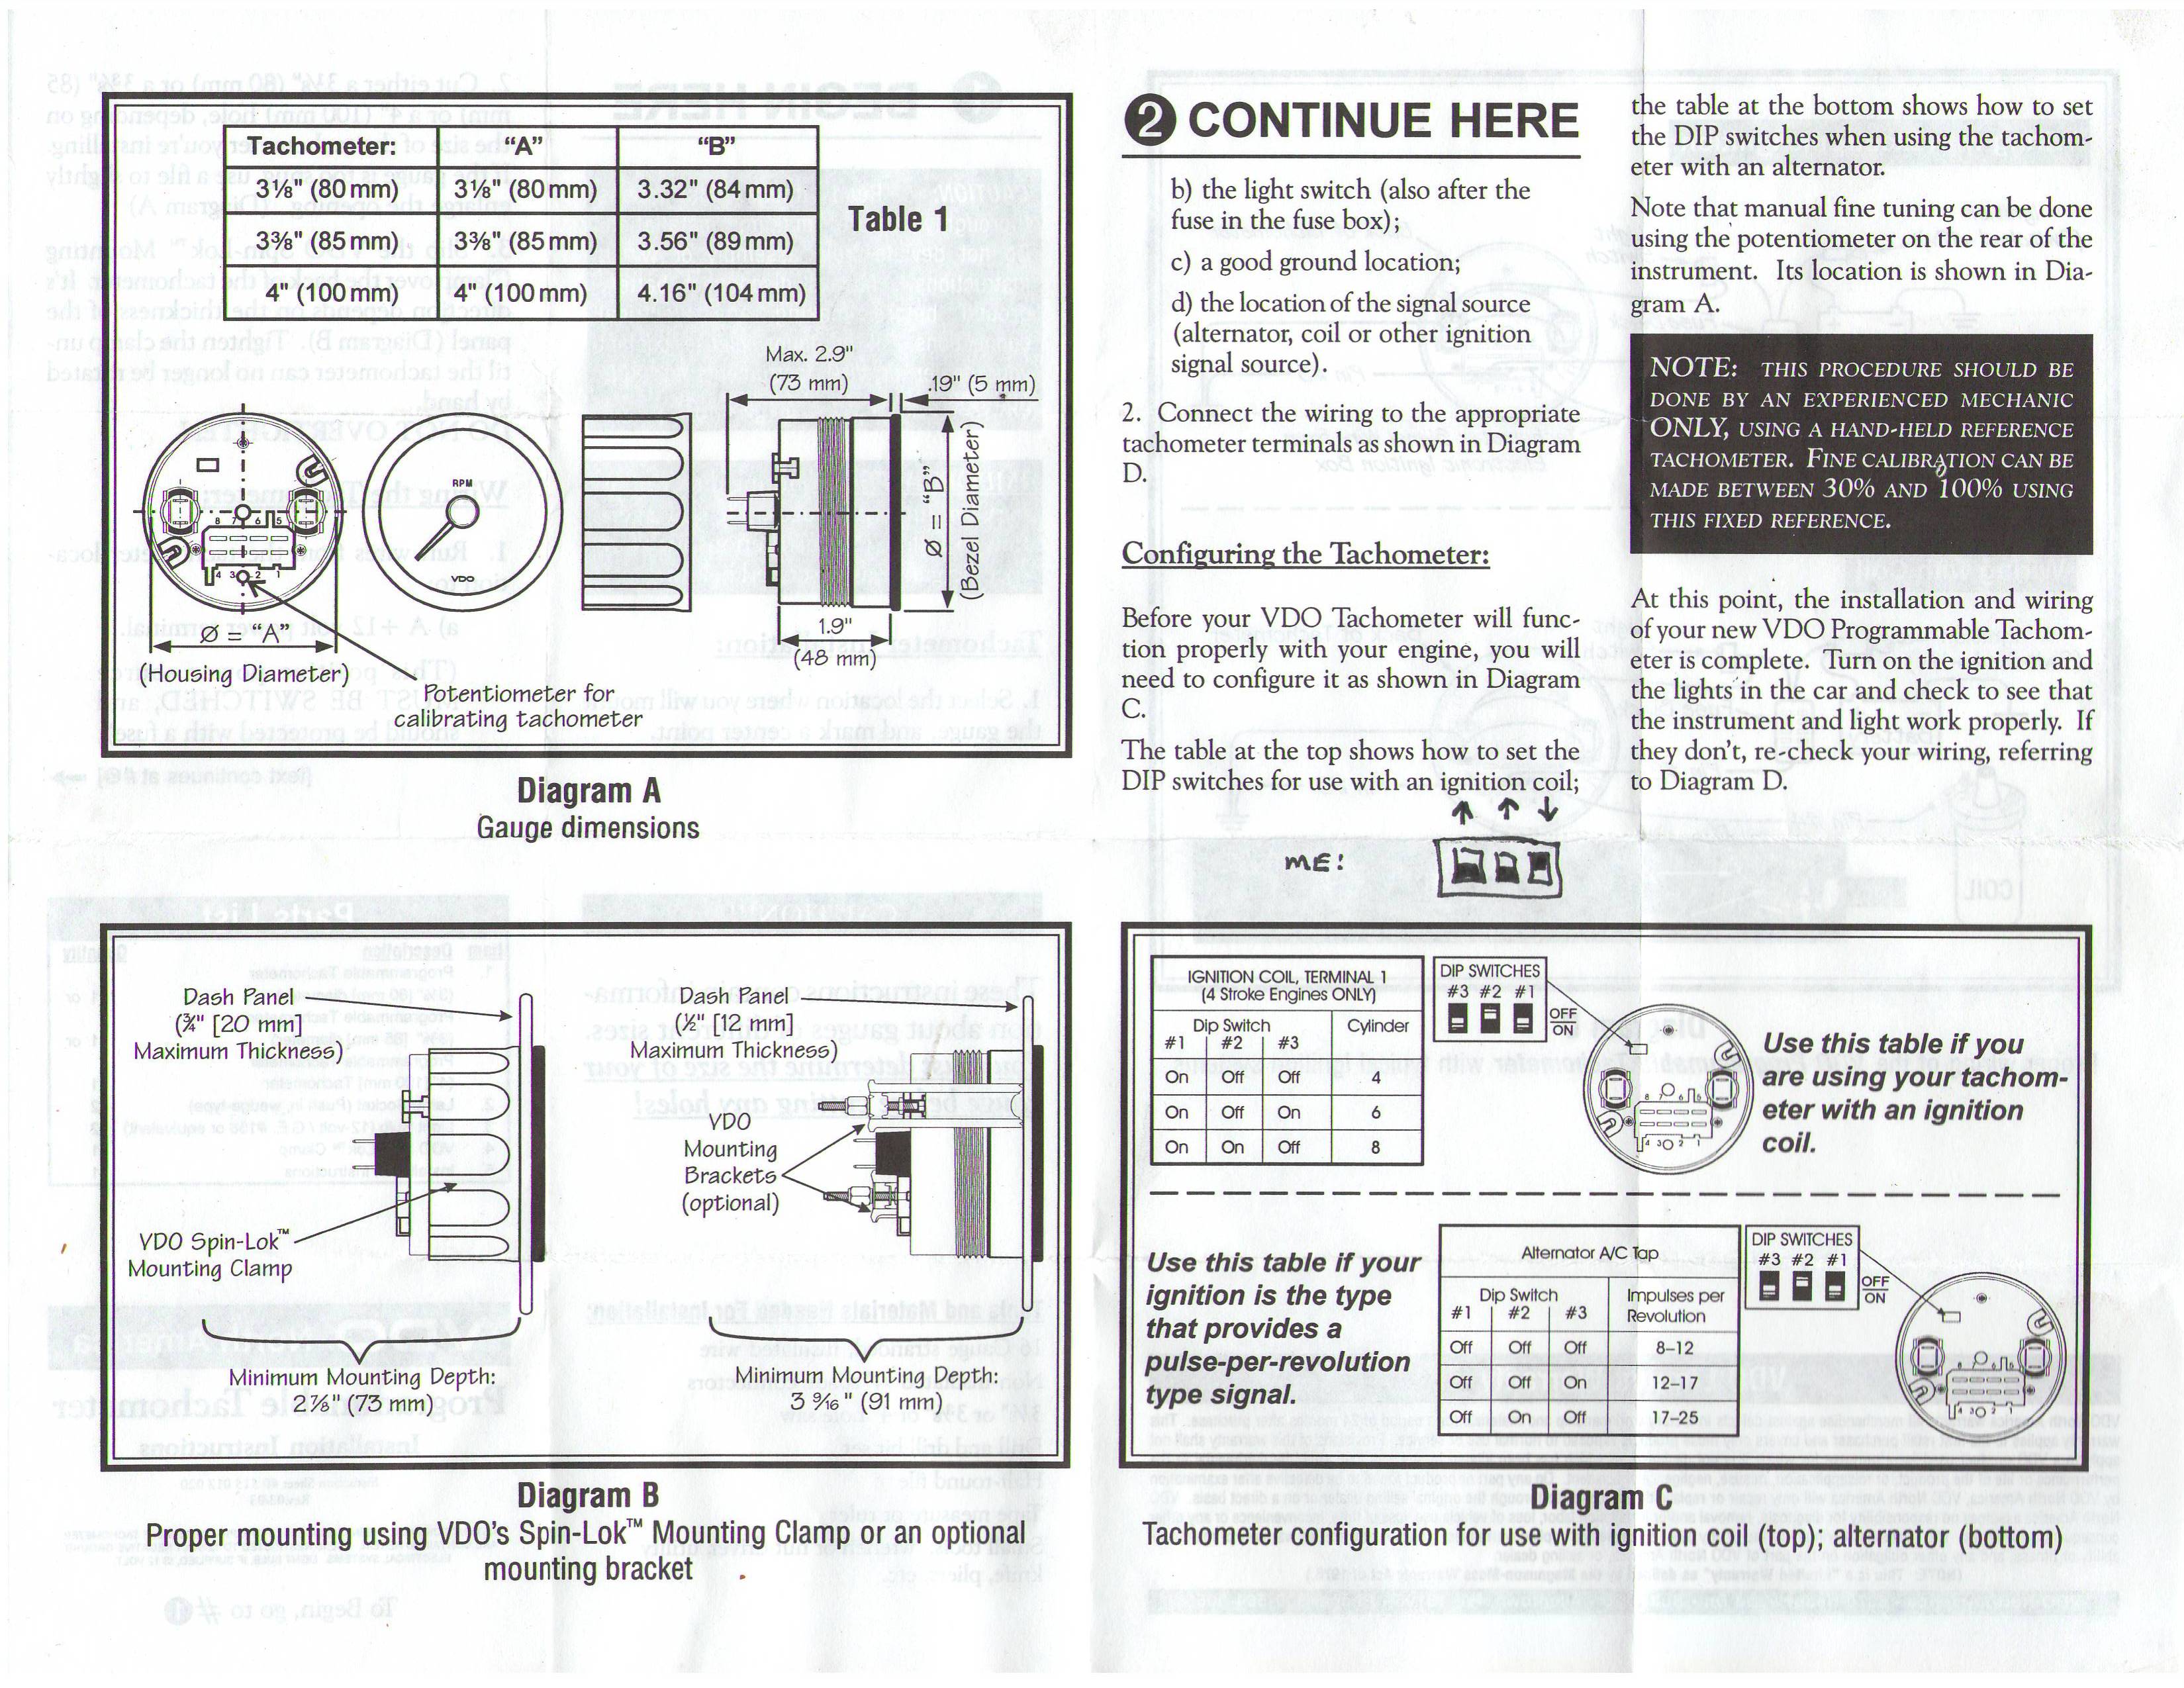
Fzj80 To Hzj80 Conversion Tach Wiring Problem

Speedometer Wiring Diagram U2013 Volovets Info

Ladyalissiya Net Picsgxm Electronic-speedometer-wiring-diagram Html Images

Installed New Gauges In My Pontoon Boat They All Work Except The Fuel Gauge Shows Full As Soon

Thesamba Com Gallery
Vdo Speedometer And Etb Sensor - The Start Line - Wscc
New 15000rpm Motorcycle Universal Lcd Digital Speedometer Tachometer Odometer Us
Dakota Digital Speedometer Wiring Diagram

Vdo Speedo Wiring - Tech Talk - Wscc
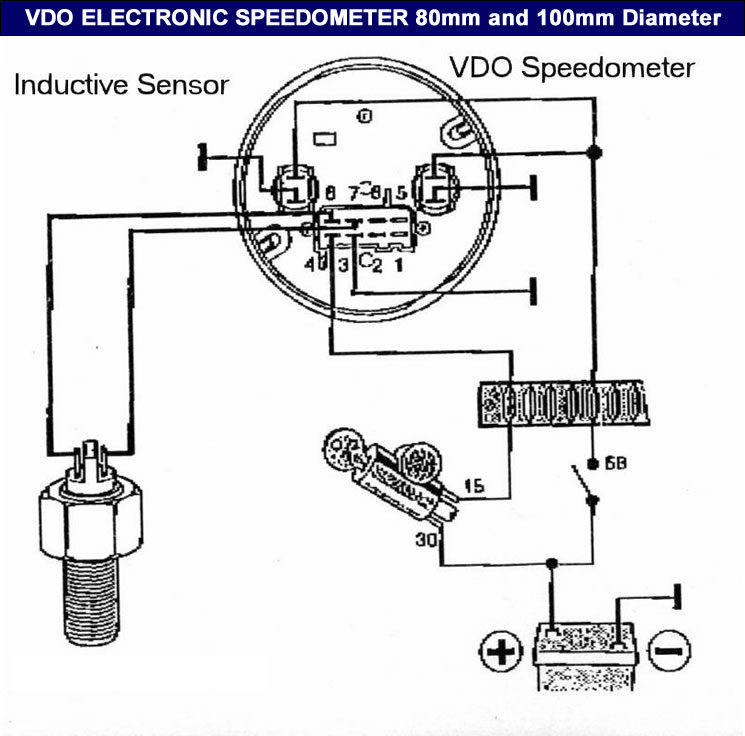
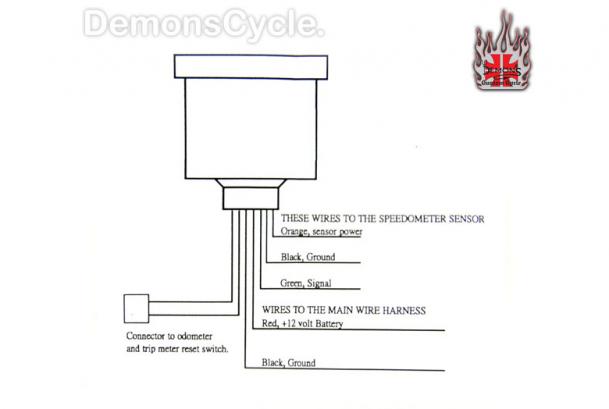
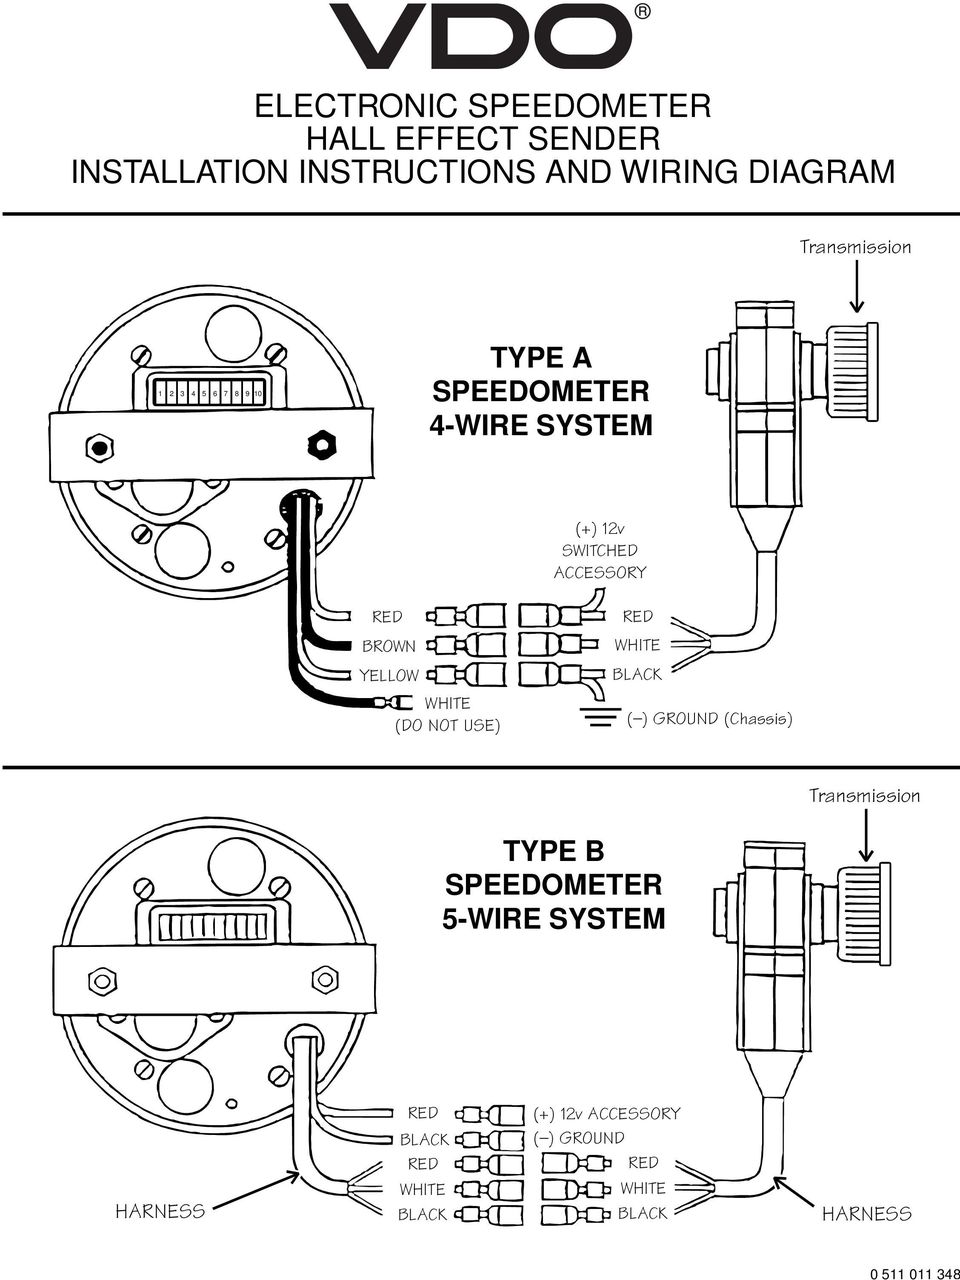
Vdo Electronic Speedometer Wiring Diagram
Duraspark 2 Tachometer Wiring

Speedometer Wiring Diagram

Motorcycle Speedometer Wiring Diagram
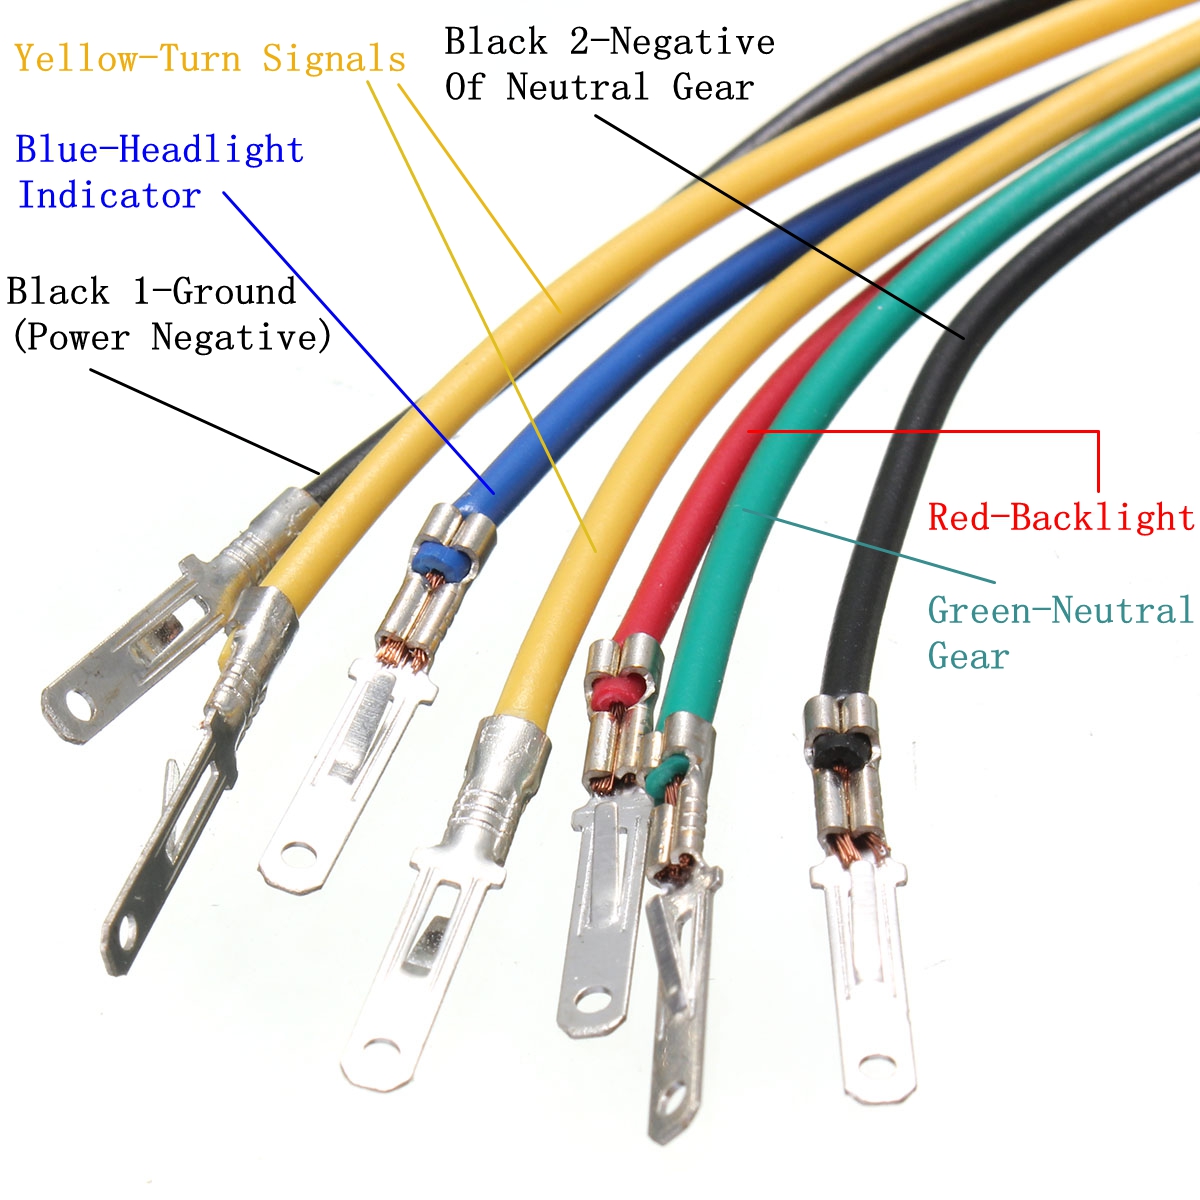
Universal Motorcycle Dual Odometer K Mh Speedometer Gauge Led Backlight Signal

Vdo Electronic Speedometer Wiring Diagram

Stewart Warner Speedometer Wiring Diagram

Wiring Aftermarket Tacho

Digital Speedometer And Odometer Circuit Using Pic Microcontroller

Speedometer Does Not Work Believe It Is Wiring Probelem And Need Wirin Diagram For 1999 Ford Ranger

Kienzle Tachograph Wiring Diagram

Custom 2 U0026quot Mini Electric Tachometer Black Gauge 16000rpm Fits Harley Motorcycle

Image A281336
Vdo Electronic Speedometer Wiring Diagram

Koso Rx1 U0026quot Gauge U0026quot Chinese Replica From Ebay - Stay Away If You Can

Autometer Gps Speedometer Wiring Diagram
Diagram Digital Speedometer Wiring Diagram
Download Digital Speedometer Wiring Diagram
The new CodeDom provider always looks for the "\roslyn" folder in \bin. The above command works as a workaround and copies the \roslyn folder from your new output folder to \bin.
One such common issue developers face is the CodeDom provider type “Microsoft.CodeDom.Providers.DotNet pilerPlatform.CSharpCodeProvider” could not be located. This article aims to explain the cause of this error and provide a clear, step by step solution to resolve it.
You can do this by checking the project's references or using the package manager console: The error message mentions version 4.1.0.0, make sure the version specified in the web.config file matches the version of the installed NuGet package.
in your Web.config file but the Microsoft.CodeDom.Providers.DotNet pilerPlatform package is not installed in the project. Check your project package references to see if the package is installed.
Replacement CodeDOM providers that use the new .NET piler Platform ("Roslyn") compiler as a service APIs. This provides support for new language features in systems using CodeDOM (e.g. ASP.NET runtime compilation) as well as improving the compilation performance of these systems.
When I build and run the container, hitting my website I get the following error... The CodeDom provider type "Microsoft.CodeDom.Providers.DotNet pilerPlatform.CSharpCodeProvider, Microsoft.CodeDom.Providers.DotNet pilerPlatform, Version=2.0.0.0, Culture=neutral, PublicKeyToken=31bf3856ad364e35" could not be located.
When I investigate this issue it turns out the project has Roslyn reference which the new environment’s IIS does not support. The solution is very simple, If you reinstall the DotNet pilerPlatform Nuget package it will resolve the issue.
After looking at a lot of possibilities, I realized that because I was deploying from a source repository and the repository did not include the BIN directory that I did not have all the dependent binaries.
In the image above, you will notice that it says "Requires a package source mapping. Configure" I have followed the Configure link, and it looks like everything is configured correctly. I don't understand what isn't working. I've followed the steps I could find online.
You can add the property
3 way switch,3 way switch wiring,3 way switch wiring diagram pdf,3 way wiring diagram,3way switch wiring diagram,4 prong dryer outlet wiring diagram,4 prong trailer wiring diagram,6 way trailer wiring diagram,7 pin trailer wiring diagram with brakes,7 pin wiring diagram,alternator wiring diagram,amp wiring diagram,automotive lighting,cable harness,chevrolet,diagram,dodge,doorbell wiring diagram,ecobee wiring diagram,electric motor,electrical connector,electrical wiring,electrical wiring diagram,ford,fuse,honeywell thermostat wiring diagram,ignition system,kenwood car stereo wiring diagram,light switch wiring diagram,lighting,motor wiring diagram,nest doorbell wiring diagram,nest hello wiring diagram,nest labs,nest thermostat,nest thermostat wiring diagram,phone connector,pin,pioneer wiring diagram,plug wiring diagram,pump,radio,radio wiring diagram,relay,relay wiring diagram,resistor,rj45 wiring diagram,schematic,semi-trailer truck,sensor,seven pin trailer wiring diagram,speaker wiring diagram,starter wiring diagram,stereo wiring diagram,stereophonic sound,strat wiring diagram,switch,switch wiring diagram,telecaster wiring diagram,thermostat wiring,thermostat wiring diagram,trailer brake controller,trailer plug wiring diagram,trailer wiring diagram,user guide,wire,wire diagram,wiring diagram,wiring diagram 3 way switch,wiring harness
